ابزار Xhorse VVDI

Xhose VVDI نرم افزار برنامه نویس اصلی و سخت افزار

ابزار Xhorse VVDI

Xhose VVDI نرم افزار برنامه نویس اصلی و سخت افزار

Condor XC-mini and M4 Clamp cut YA226 House Key

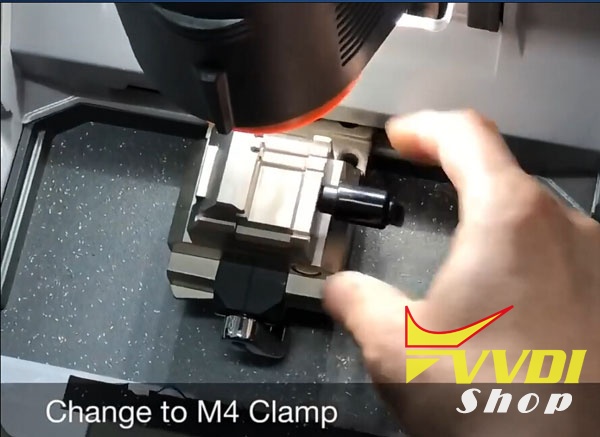
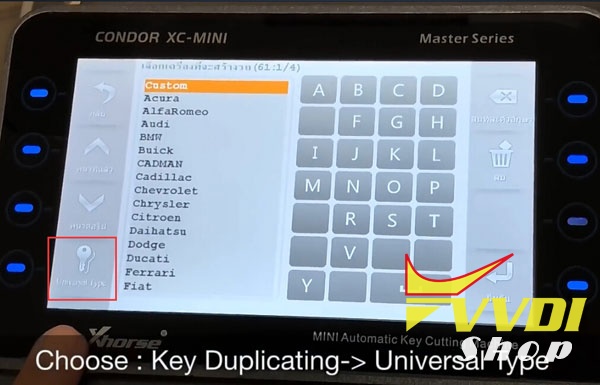
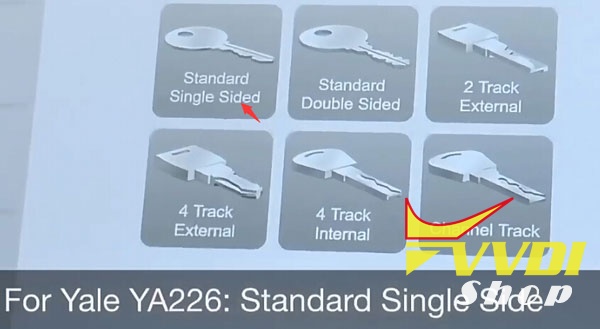
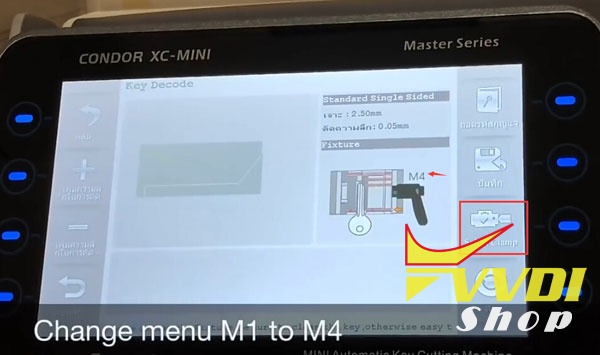
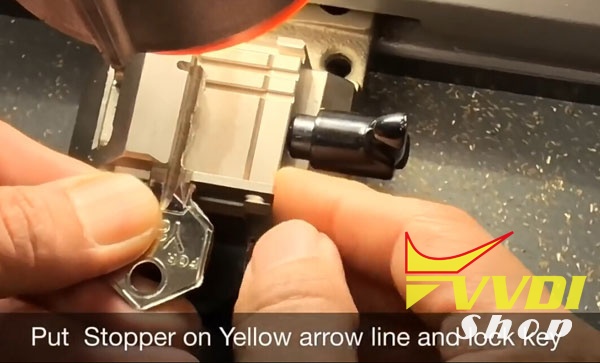
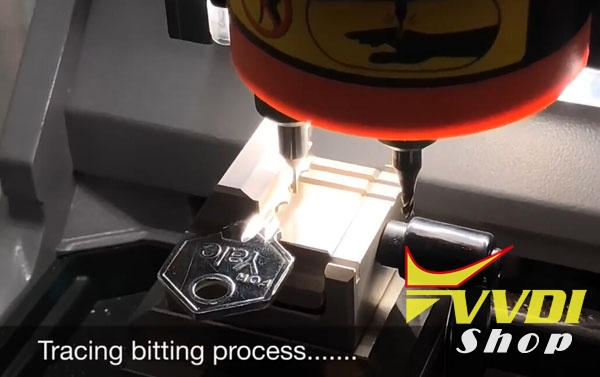
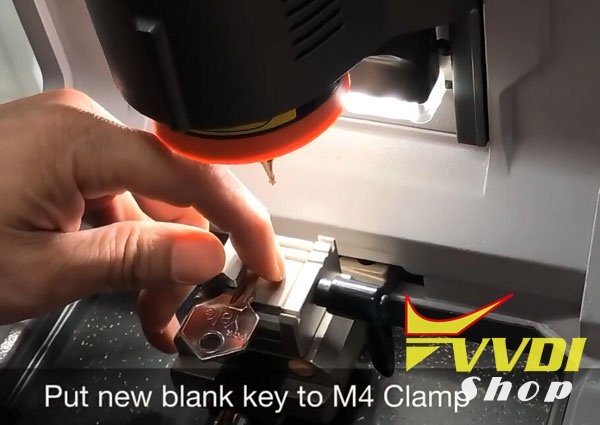
How-to: use Xhorse Condor xc-mini /xc-mini plus key cuttingn machine and M4 Clamp for house key trace and cut YA226 by universal type menu.
condor-mini-m4-clamp-ya226-house-key-1
condor-mini-m4-clamp-ya226-house-key-2
New Xhorse M4 Clamp is used for housekey. It comes with stopper and 2 size of lifting wires
How to trace and cut Yale YA226 key?
condor-mini-m4-clamp-ya226-house-key-3

condor-mini-m4-clamp-ya226-house-key-4
Change to M4 clamp
condor-mini-m4-clamp-ya226-house-key-5

condor-mini-m4-clamp-ya226-house-key-6
In Condor Mini, choose Key Duplicating->Universal Type 
condor-mini-m4-clamp-ya226-house-key-7
Choose key type. In Yale YA226: Standard single sided
condor-mini-m4-clamp-ya226-house-key-8
condor-mini-m4-clamp-ya226-house-key-9
1.Keep the key/probe/fixture clean.
2.Recommended to use M1, M4 clamp and 1.5mm drill(cutter). Here we use M4 clamp.
Change menu M1 to M4
condor-mini-m4-clamp-ya226-house-key-10
Use tracer: 1mm and cutter 1.5mm
condor-mini-m4-clamp-ya226-house-key-11

condor-mini-m4-clamp-ya226-house-key-12
 Put stopper on Yellow arrow line and lock key
condor-mini-m4-clamp-ya226-house-key-13
Tracing bitting process…
condor-mini-m4-clamp-ya226-house-key-14
Show bitting
Show tracing bitting again
condor-mini-m4-clamp-ya226-house-key-15
Put new blank key to M4 clamp 
condor-mini-m4-clamp-ya226-house-key-16
Press Cut and close shield
condor-mini-m4-clamp-ya226-house-key-17
Cuttin in progress
condor-mini-m4-clamp-ya226-house-key-18
Cutting YA226 house key success
condor-mini-m4-clamp-ya226-house-key-19
Test the new key, it works perfectly.

How to change Battery of Condor XC-mini

This is the Power Supply Adapter with Battery for Xhorse Condor XC-Mini key cutting machine. No need to connect Car inverter, battery as power supply, easy to carry out. Support household electricity and cigarette lighter to recharge or use as power supply.
condor-xc-mini-battery


List of rechargeable battery of XC-Mini 

① Mainboard 
② Cable of 6 & 7 
③ Battery charger & display module 
④ Vehicle charging line 
⑤ Adaptor 220V


Specification of rechargeable battery of XC-Mini:
Standard voltage 25.9V 
Limited charge voltage 29.4V 
Rated Capacity 2500mAh 
Power Ra 73.5Wh 


Note: The update version Condor XC-Mini Plus with built-in battery is coming soon. Don't need to change chargeable battery any more.


Instruction of how to change the built-in battery of Condor MINI:

change-battery-condor-mini-1
Remark: please follow the procedure to operation in case of damage the Mainboard ,do not connect the power during operation

Attention : For your security, do not connect the power in next steps

change-battery-condor-mini-2
1 , Take off those 4 screws like the picture show 
change-battery-condor-mini-3
2 , Push the motor inside and hold the white buckle then take out the emergency-stop module like the picture show
change-battery-condor-mini-4
change-battery-condor-mini-5
3 , Loose the connection of position 11 &12 like picture show
change-battery-condor-mini-6
4 , Use a screw to make the connection those two cables what are from position 11 & 12 like the picture show ,and use the acetate tape fix the connection well 
change-battery-condor-mini-7
5, Fix the cable 6 to the position 12 , cable 7 for position 11 , then put the emergency – stop module back and fix it well
change-battery-condor-mini-8
6, Take off those 2 screws like picture show
change-battery-condor-mini-9
7, Turn over the Mini Condor and take off the foot rubber and 
change-battery-condor-mini-10
8, Take out the Power-board and disconnect all cables like picture show
change-battery-condor-mini-11
9, Use the battery charger & display module to replace the original power interface like picture show 
change-battery-condor-mini-12
10 , Fix the cable into the socket according the number between the cable and socket ,make sure very cable will be fix well
change-battery-condor-mini-13
11, Fix the cable of 24V and cable of GND in the right position like picture show
change-battery-condor-mini-14
12, Connection the power like picture show then put back the Mainboard and fix it well
change-battery-condor-mini-15
13, Fix the all cables after put back the mainboard , the mainboard should be in fixed very solid ,manage the cables again if not , then fix the foot rubber and screws 
change-battery-condor-mini-16
14, Fix those screws like picture show
change-battery-condor-mini-17
15 , The screen , LED , display of battery charger should be on after you press the emergency – stop button , if not ,check the connection again

Remark : electricity volume will be show by the green light , the LED that is mark ‘’ CHRG ‘’ should be green if it is charged , it will be red during charging.

Xhorse Condor XC-Dolphin vs. Condor XC-Mini

Xhorse have been busy working on the new CNC key cutting machine- XC-Dolphin.
It is a small, compact machine with 10kg of weight.
And of course as everything new these days – it is controlled by connecting to your phone by Bluetooth. Possible to connect to computer too.
Condor XC-Dolphin vs. Condor XC-Mini
Condor XC-Dolphin key machine is an entry-level product of the CONDOR CNC machine family. The body design is simple, it is very suitable for mobile use in the mobile scene, without operating screen, you need to connect a mobile phone or tablet, and install a dedicated APN.
indexXC-DOLPHIN
Condor XC-MINI
SpindleMechanical shaft +60W DC motor (with a foreign model)” “Electric spindle brushless 300W, built-in angular contact bearingElectric spindle brushless 300, built-in angular contact bearing
Transmission mechanism“T-shaped screw + anti-backlash nutBall screw
guideRoller guideCross-track
shellBase aluminum alloy die-casting, the upper body is made of plastic shell and the body is made of integrated aluminum alloy die-casting.Plastic outer casing body is formed by body alloying die casting
FixtureStandard fixtureTwo sets of standard fixtures
ManipulationNo touch screen, no built-in databaseQuick start, with touch screen, built-in database
Offline operationnot supportstand by
Dedicated appSupport dedicated mobile phone APpSupport dedicated mobile APP
Built-in batteryNot supported, optional external batterystand by
protecting maskSimple protective coverComprehensive protection
VVD bindingnot supportstand by
Cutting speed1X SPEED2X SPEED
weight<10kg18kg
Warranty1 year3 years
Note: Condor XC-Dolphin is not yet for sale now.
condor-xc-Dolphin-1

condor-xc-Dolphin-2

condor-xc-Dolphin-3

Xhorse Condor XC-Mini Software Update to V5.0.9

Xhorse Condor XC-Mini (KM03) key cutting machine software released to V5.0.9 (2018/05/23).


Condor Mini 5.0.9 Update Feature:

Add universal key decode function
Add M2-D function
Add motor sensor testing function
Modify probe cutter detection
Fix machine may cra sh error problem
Fix HU49 key decide error
Fix HU66 cutting speed issue


Use the xhorse update kit to update Condor software:
https://mega.nz/#!QTx3yYKb!OW3Mc4sBaMqUSCUfWtPM4__Od-OPkemRe2j4EfPHRLo

How to update Xhorse Condor XC-mini power supply

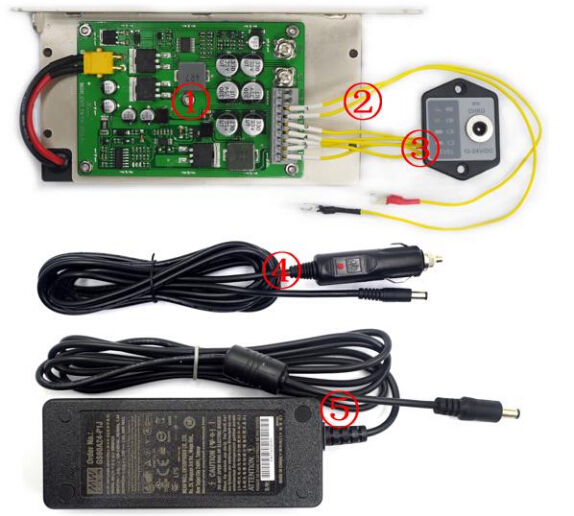
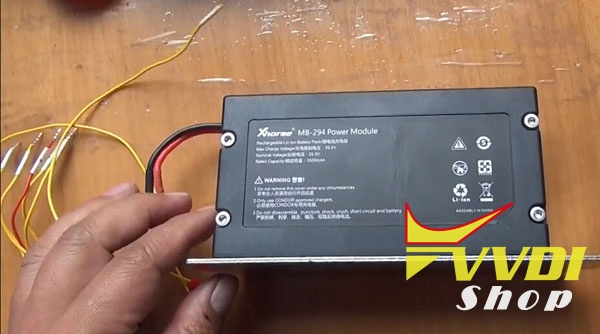
Xhorse released new power supply adapter with battery for Condor XC-Mini key cutting machine with which you can cut 40 keys per charge.

change-condor-mini-power-supply-1

change-condor-mini-power-supply-4

change-condor-mini-power-supply-3

change-condor-mini-power-supply-2

How to change/update Condor XC-Mini built-in power supply?


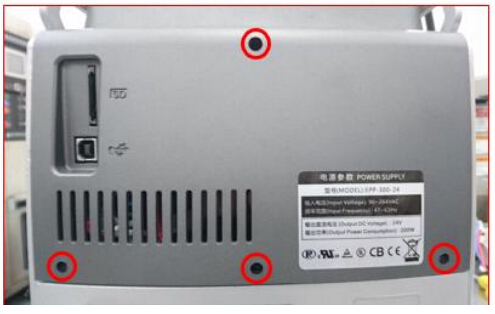
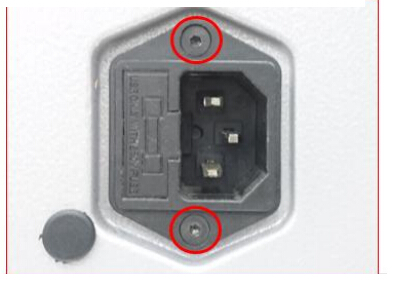
1.Remove the screws.
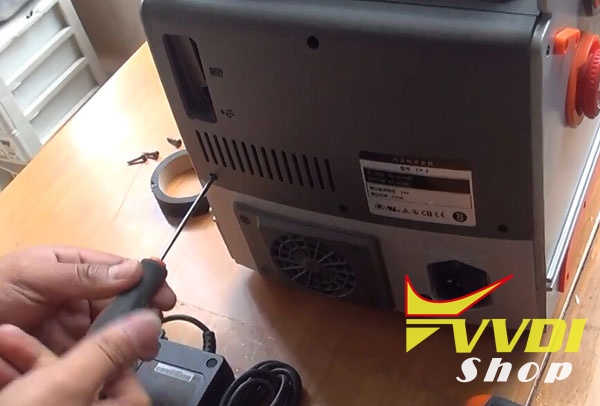
change-condor-mini-power-supply-5

2.Remove the shell.

change-condor-mini-power-supply-6

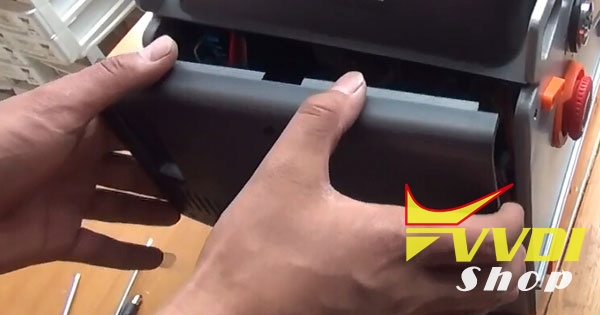
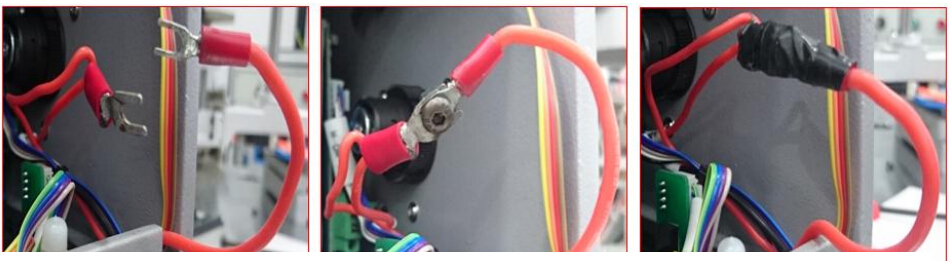
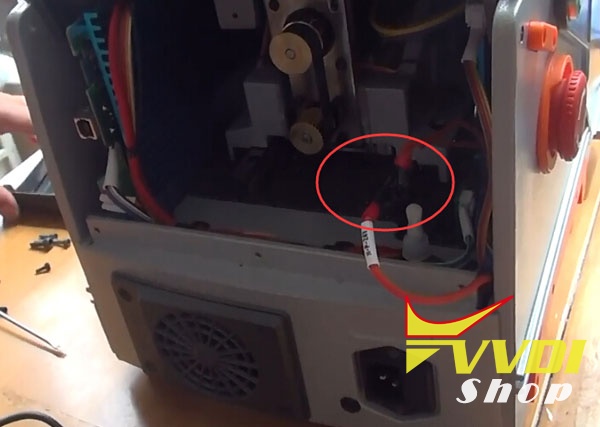
3.Rotate the little round screw to the innermost.

change-condor-mini-power-supply-7

4.Then we need to remove the clip.Pull it out.

change-condor-mini-power-supply-8

5.Rotate the screws on both sides,remove out the clip.

change-condor-mini-power-supply-9

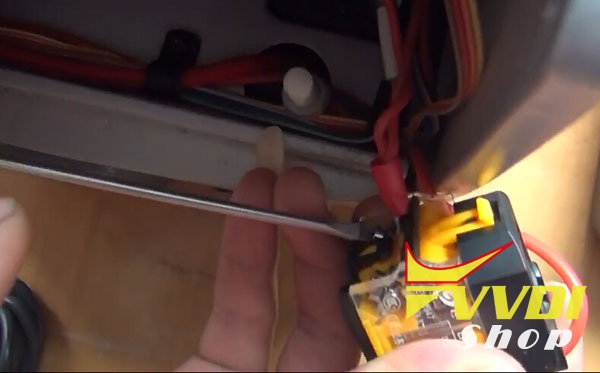
6.Use insulating tape to connect two cables together.

change-condor-mini-power-supply-10

change-condor-mini-power-supply-11

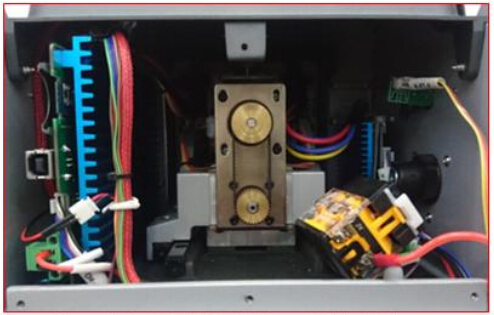
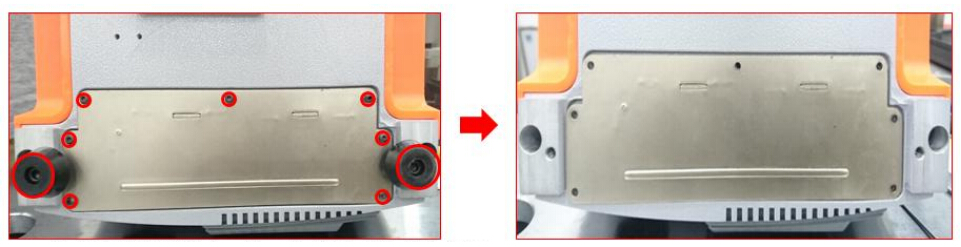
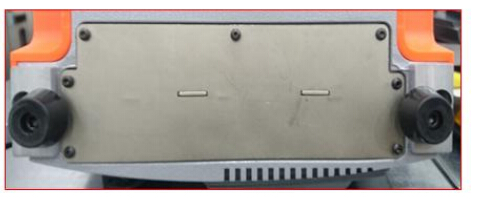
7.Lay down condor mini machine.Remove the screws.

change-condor-mini-power-supply-12

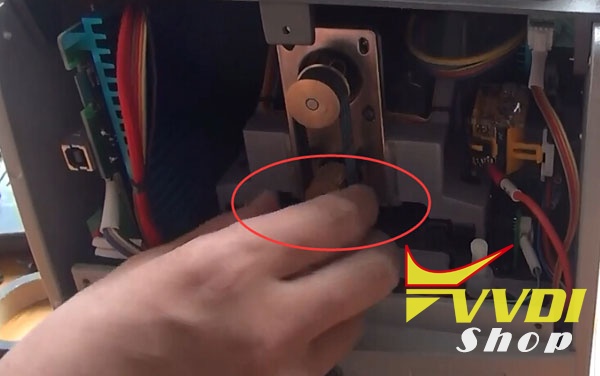
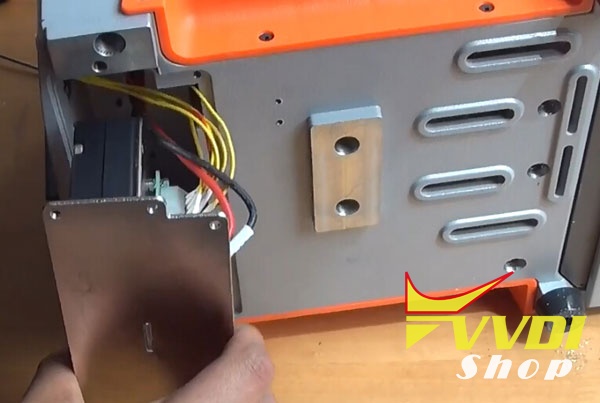
8.Take out the board.Unplug the clip.

change-condor-mini-power-supply-13

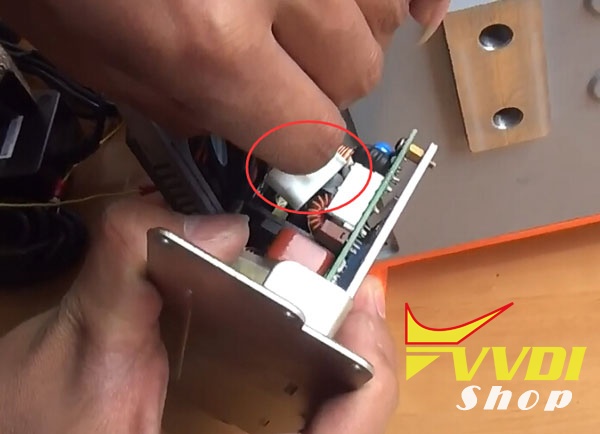
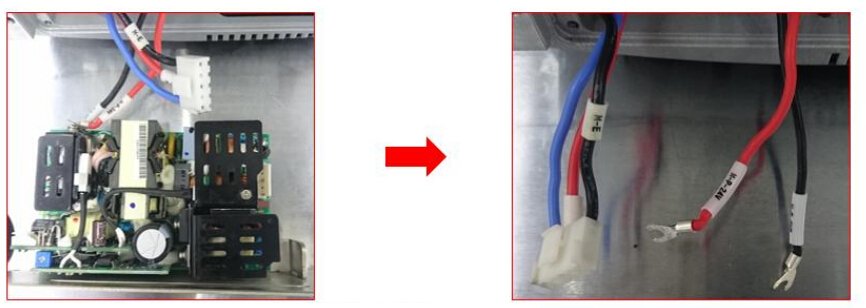
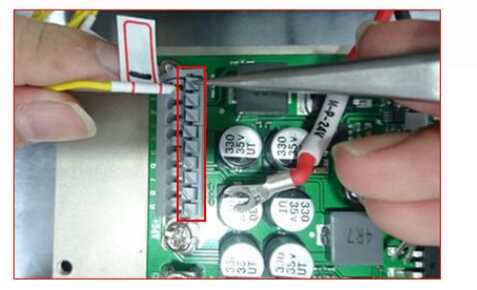
Rotate two screws to remove the cables from the PCB.

change-condor-mini-power-supply-14

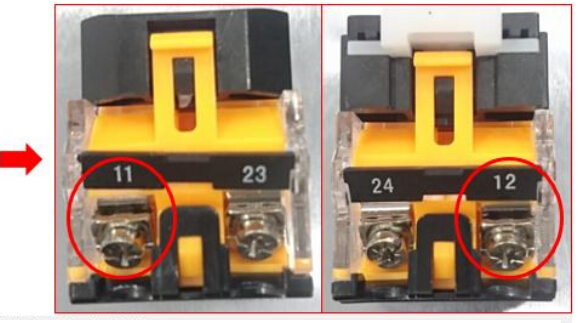
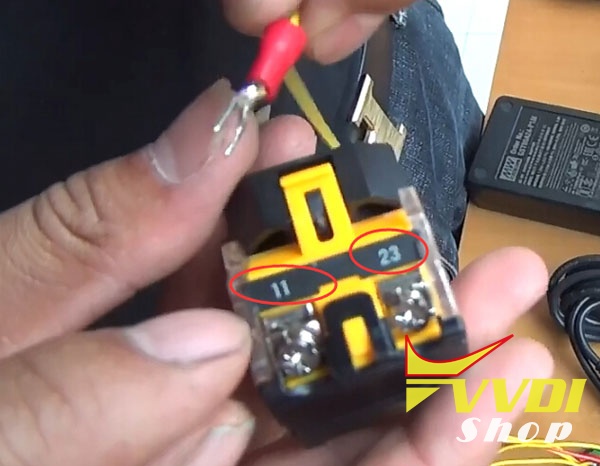
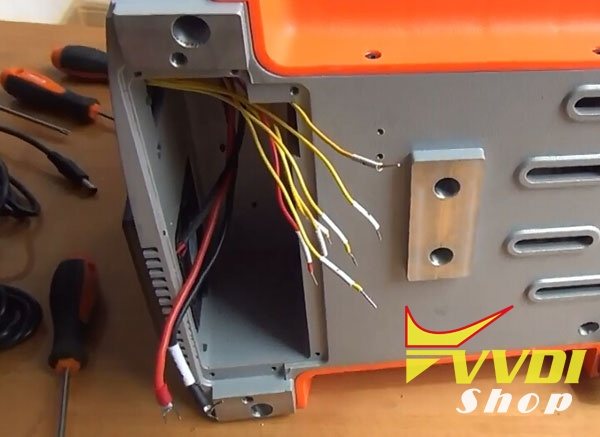
9.Here two separate yellow color cable,number 7 and 6.

change-condor-mini-power-supply-15

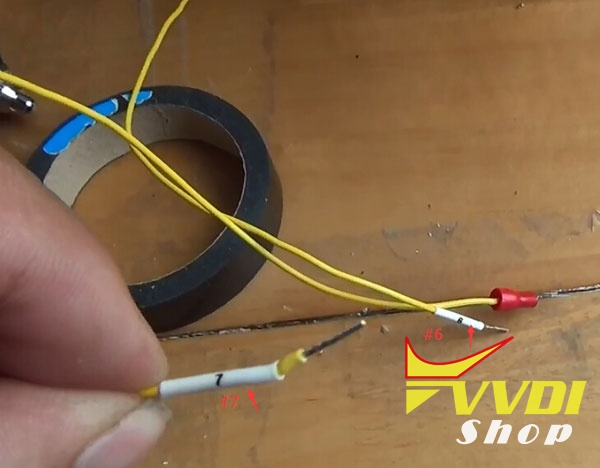
10.Number 6 cable is connected to 12 on clip.

Cable 7 connects with 11. Lock the screws.

change-condor-mini-power-supply-16

11.Put back clip to original place.

change-condor-mini-power-supply-17

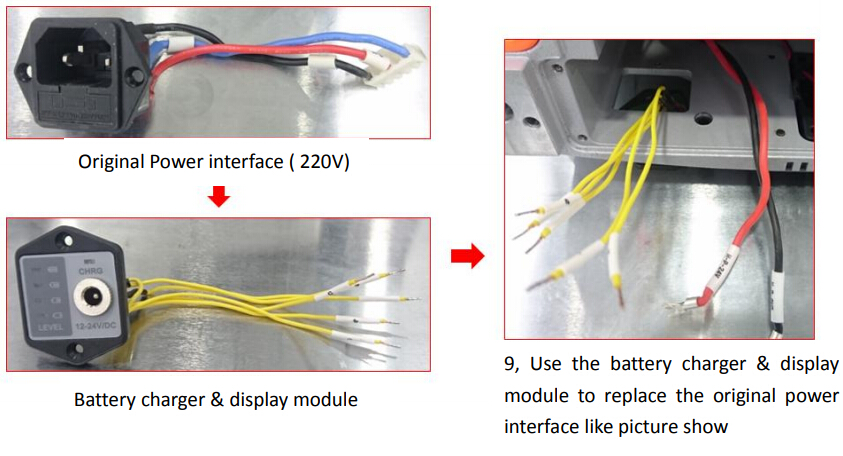
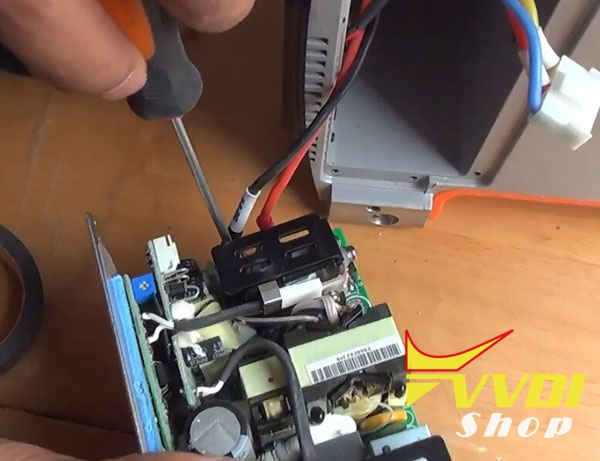
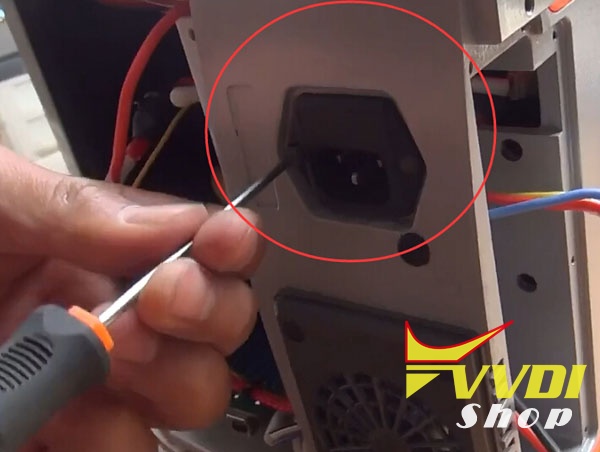
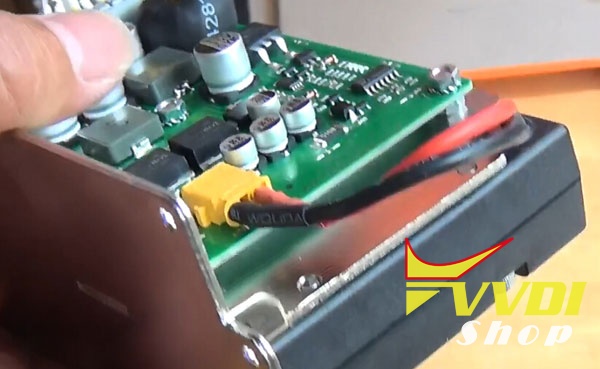
12.Next step: remove the power adapter on Condor MINI

change-condor-mini-power-supply-18

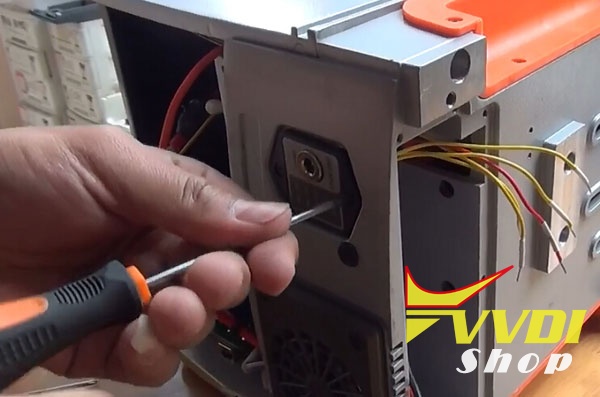
13.Put the new power adapter.You can find new power adapter in Power Supply Adapter with Battery Kit.

Put back screws and lock it.

change-condor-mini-power-supply-19

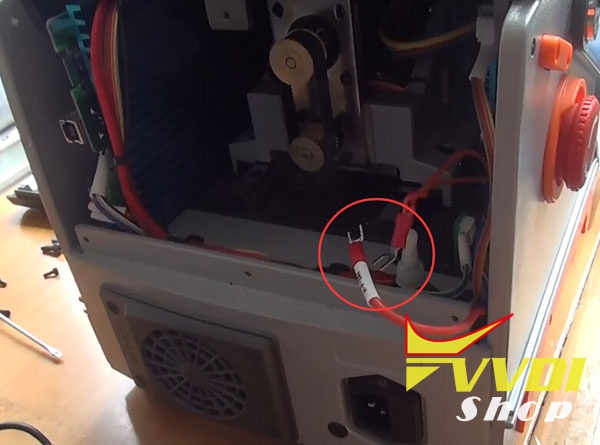
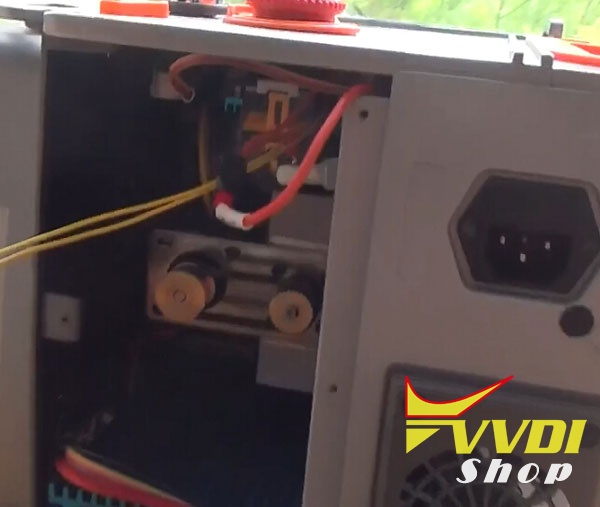
14.Put two yellow cables together with new power  adapter cables under the clip through the hole.

change-condor-mini-power-supply-20

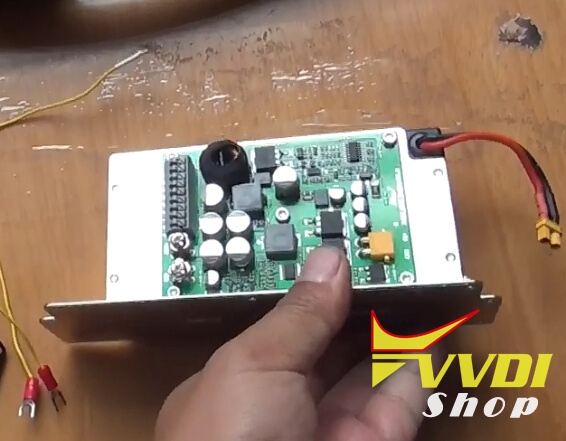
15.Connect Power Adapter battery PCB.

It lists out number from 1 to 9,and 24V.

change-condor-mini-power-supply-21

change-condor-mini-power-supply-22

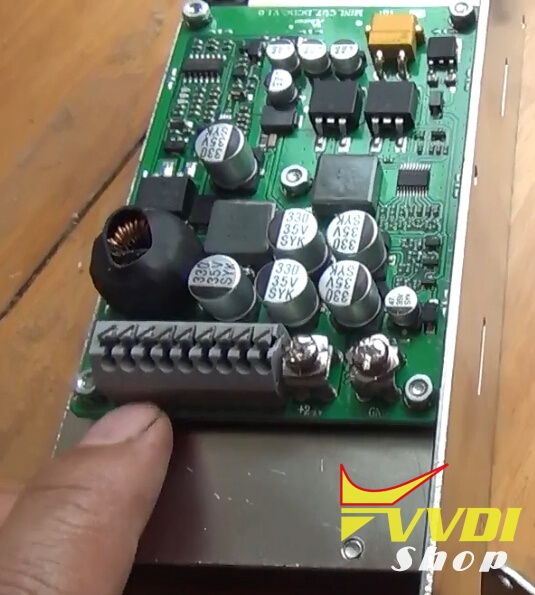
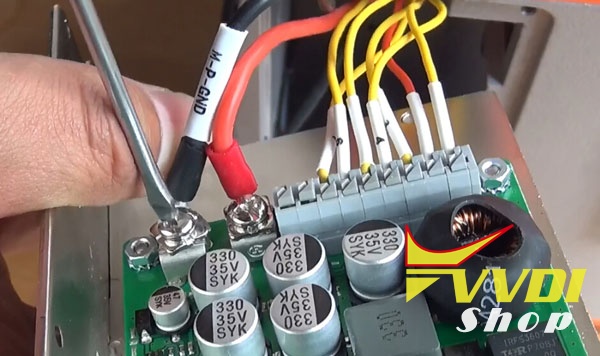
16.Connect cables to the numbers, VCC and GND. Please note the numbers must be matched.

Connect cables,as well as VCC and GND.

change-condor-mini-power-supply-23

change-condor-mini-power-supply-24

17.Put back PCB to condor mini.And two shells,lock the screws.

change-condor-mini-power-supply-25

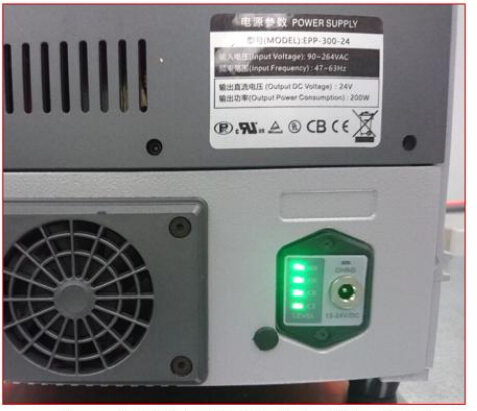
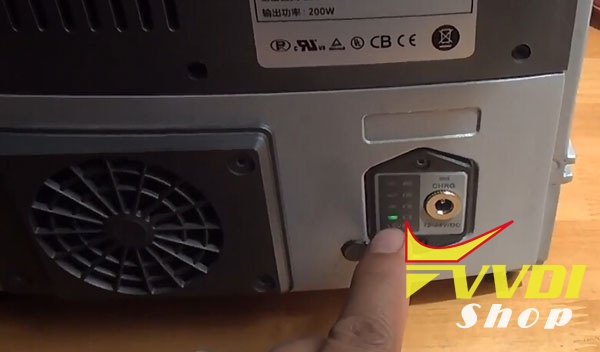
18.Now,we power on to start for test.It shows charge capacity.

change-condor-mini-power-supply-26

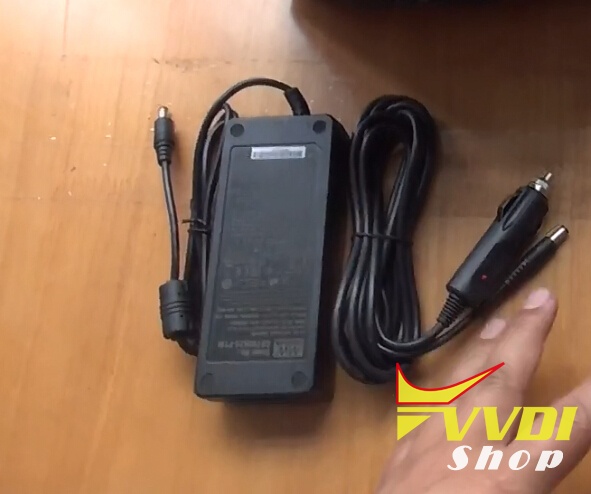
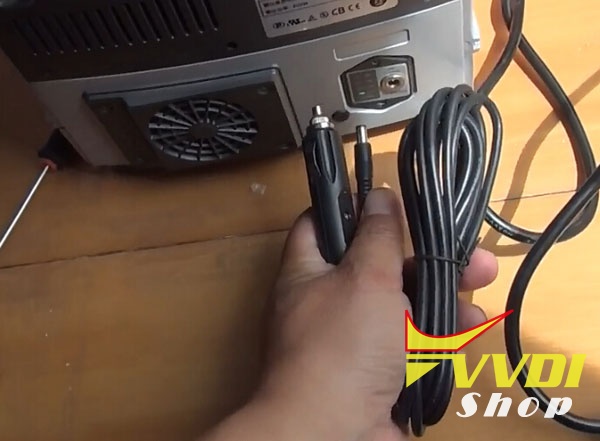
19.Use old charge cable with new charge adapter,connect with power supply,it can charge power.

We can also use Car cigarette lighter cable to charge.

change-condor-mini-power-supply-27

change-condor-mini-power-supply-28

20.Upgrade to the built-in power supply successfully.


www.vvdishop.com