ابزار Xhorse VVDI
Xhose VVDI نرم افزار برنامه نویس اصلی و سخت افزارابزار Xhorse VVDI
Xhose VVDI نرم افزار برنامه نویس اصلی و سخت افزارابر برجسب
vvdi key tool max VVDI Mini Key Tool vvdi key tool vvdi2 vag vvdi mb tool dolphin xp005 xhorse vvdi prog xhorse vvdi key tool vvdi super chip vvdi mini obd tool Xhorse Condor vvdi mb vvdi key tool plus VVDI Prog vvdi2جدیدترین یادداشتها
همه- Program Opel Corsa D Key with VVDI Key Tool Plus
- Xhorse VVDI Key Tool Plus Read BMW N63 ISN Code
- Xhorse Multi Prog Read GM Delco E92 on Bench
- Read BMW MSV90 DME with Xhorse Multi Prog
- Xhorse Condor II Error Code 42 Solution
- Xhorse Dolphin XP005 Gen1 Replacement Manual
- Xhorse Condor XC-002 Pro Review What is Good
- Tipt to Cut B119 Key Blank with Xhorse Dolphin XP005
- Tips to Decode GM B106 Key Blank with Xhorse Dolphin XP005
- VVDI Super Chip XT27A or XT27B for Ford ID49 2015+
بایگانی
- اردیبهشت 1403 3
- فروردین 1403 19
- اسفند 1402 19
- بهمن 1402 12
- دی 1402 15
- آذر 1402 19
- آبان 1402 19
- مهر 1402 14
- شهریور 1402 19
- مرداد 1402 18
- تیر 1402 18
- خرداد 1402 21
- اردیبهشت 1402 20
- فروردین 1402 21
- اسفند 1401 19
- بهمن 1401 17
- دی 1401 19
- آذر 1401 19
- آبان 1401 19
- مهر 1401 17
- شهریور 1401 21
- مرداد 1401 20
- تیر 1401 20
- خرداد 1401 17
- اردیبهشت 1401 21
- فروردین 1401 22
- اسفند 1400 19
- بهمن 1400 13
- دی 1400 23
- آذر 1400 16
- آبان 1400 18
- مهر 1400 15
- شهریور 1400 18
- مرداد 1400 17
- تیر 1400 18
- خرداد 1400 18
- اردیبهشت 1400 20
- فروردین 1400 20
- اسفند 1399 18
- بهمن 1399 9
- دی 1399 16
- آذر 1399 14
- مرداد 1399 11
- تیر 1399 14
- خرداد 1399 10
- اردیبهشت 1399 14
- فروردین 1399 13
- اسفند 1398 15
- بهمن 1398 1
- دی 1398 11
- آذر 1398 17
- آبان 1398 17
- مهر 1398 11
- شهریور 1398 17
- مرداد 1398 19
- تیر 1398 10
- خرداد 1398 14
- اردیبهشت 1398 12
- فروردین 1398 10
- اسفند 1397 11
- بهمن 1397 5
- دی 1397 11
- آذر 1397 10
- آبان 1397 11
- مهر 1397 6
- شهریور 1397 5
- مرداد 1397 6
- تیر 1397 6
- خرداد 1397 9
- اردیبهشت 1397 5
- فروردین 1397 8
- اسفند 1396 9
- بهمن 1396 7
- دی 1396 13
- آذر 1396 8
- آبان 1396 9
- مهر 1396 6
- شهریور 1396 7
- مرداد 1396 4
- تیر 1396 6
- خرداد 1396 11
- اردیبهشت 1396 6
جستجو
آمار : 40804 بازدید
Powered by Blogsky
How to change Battery of Condor XC-mini
This is the Power Supply Adapter with Battery for Xhorse Condor XC-Mini key cutting machine. No need to connect Car inverter, battery as power supply, easy to carry out. Support household electricity and cigarette lighter to recharge or use as power supply.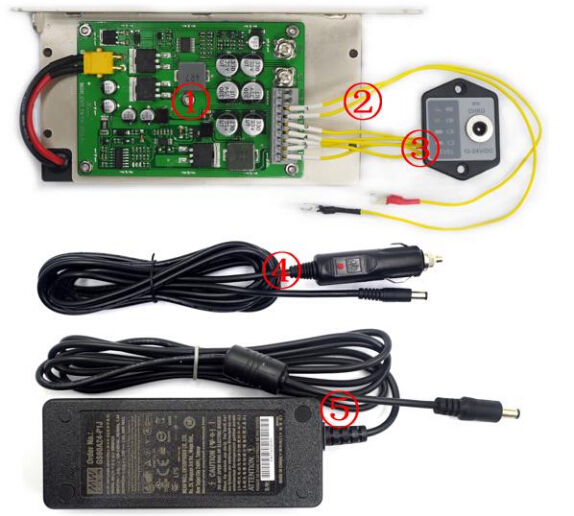
List of rechargeable battery of XC-Mini
① Mainboard
② Cable of 6 & 7
③ Battery charger & display module
④ Vehicle charging line
⑤ Adaptor 220V
Specification of rechargeable battery of XC-Mini:
Specification of rechargeable battery of XC-Mini:
Standard voltage 25.9V
Limited charge voltage 29.4V
Rated Capacity 2500mAh
Power Ra 73.5Wh
Note: The update version Condor XC-Mini Plus with built-in battery is coming soon. Don't need to change chargeable battery any more.
Instruction of how to change the built-in battery of Condor MINI:

Remark: please follow the procedure to operation in case of damage the Mainboard ,do not connect the power during operation
Attention : For your security, do not connect the power in next steps

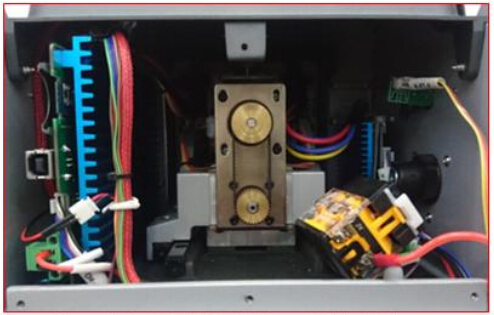
2 , Push the motor inside and hold the white buckle then take out the emergency-stop module like the picture show
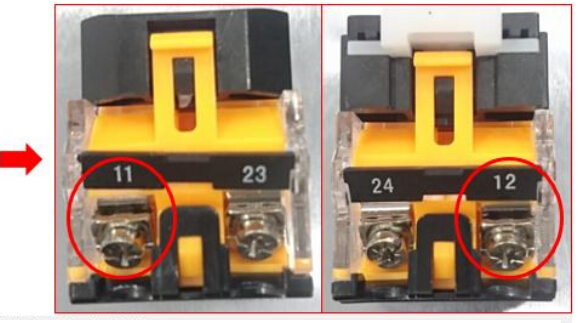
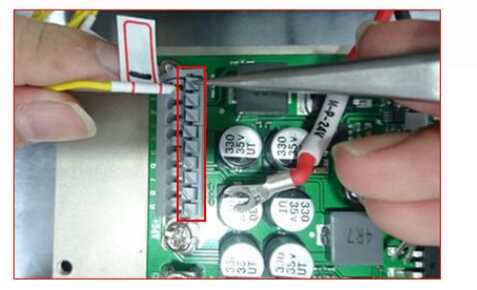
3 , Loose the connection of position 11 &12 like picture show
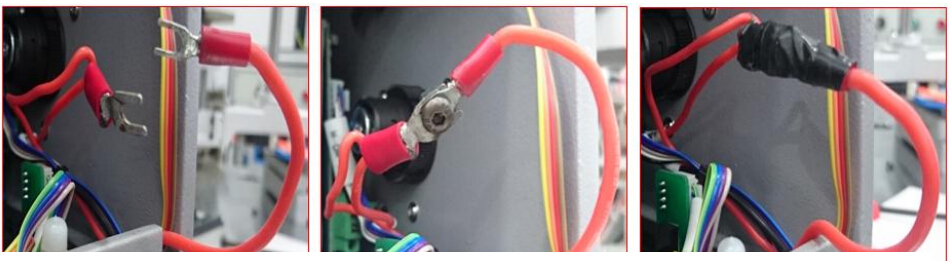
4 , Use a screw to make the connection those two cables what are from position 11 & 12 like the picture show ,and use the acetate tape fix the connection well

5, Fix the cable 6 to the position 12 , cable 7 for position 11 , then put the emergency – stop module back and fix it well
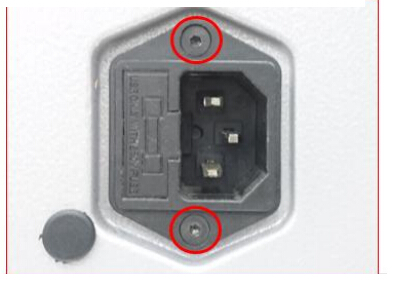
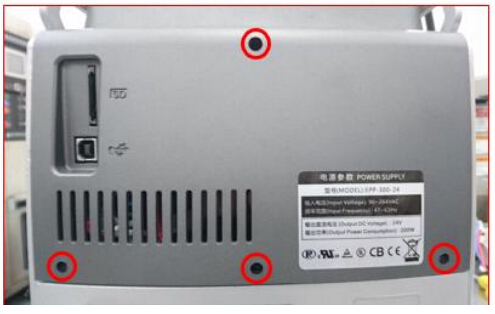
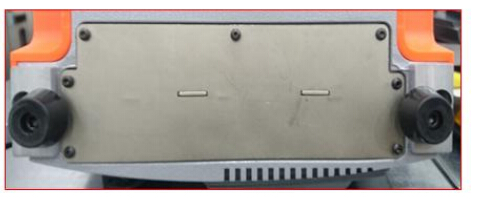
6, Take off those 2 screws like picture show
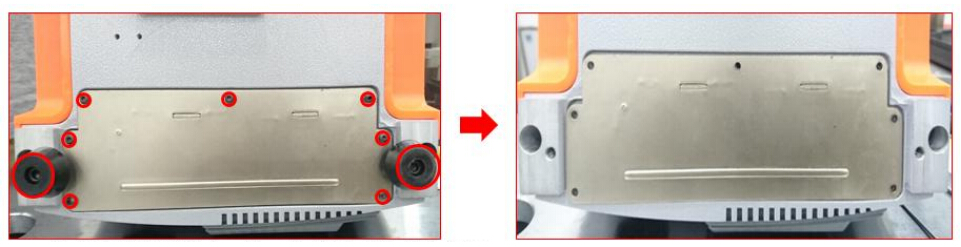
7, Turn over the Mini Condor and take off the foot rubber and
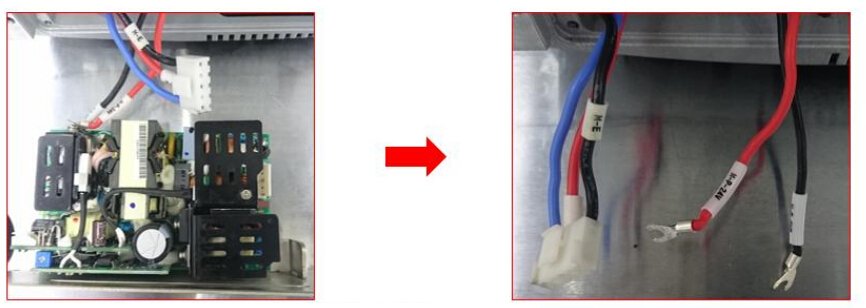
8, Take out the Power-board and disconnect all cables like picture show
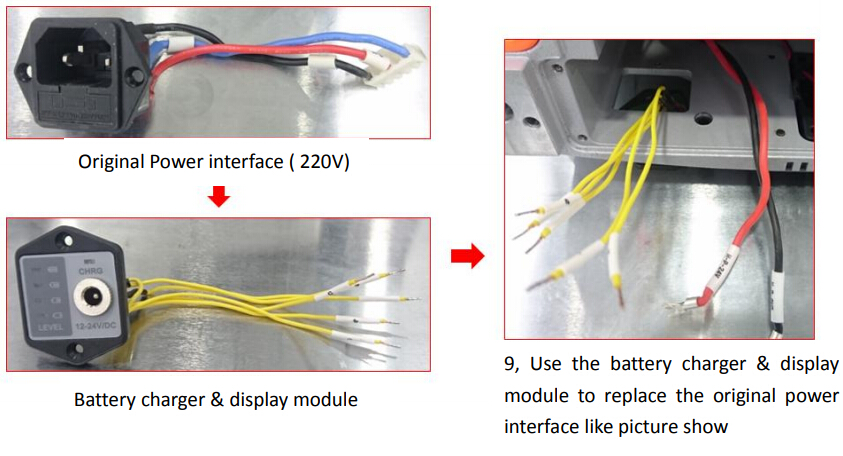
9, Use the battery charger & display module to replace the original power interface like picture show
10 , Fix the cable into the socket according the number between the cable and socket ,make sure very cable will be fix well

11, Fix the cable of 24V and cable of GND in the right position like picture show

12, Connection the power like picture show then put back the Mainboard and fix it well
13, Fix the all cables after put back the mainboard , the mainboard should be in fixed very solid ,manage the cables again if not , then fix the foot rubber and screws

14, Fix those screws like picture show
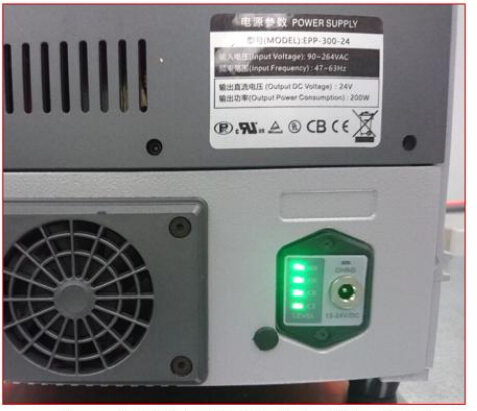
15 , The screen , LED , display of battery charger should be on after you press the emergency – stop button , if not ,check the connection again
Remark : electricity volume will be show by the green light , the LED that is mark ‘’ CHRG ‘’ should be green if it is charged , it will be red during charging.
Emily
سهشنبه 13 شهریور 1397 ساعت 12:53