ابزار Xhorse VVDI
Xhose VVDI نرم افزار برنامه نویس اصلی و سخت افزارابزار Xhorse VVDI
Xhose VVDI نرم افزار برنامه نویس اصلی و سخت افزارFree Download Xhorse Dolphin II Key Cutting Machine User Manual
What’s the difference between the new Xhorse Dolphin XP005L (Dolphin II) and Dolphin XP005 key cutting machine?
Similarities:
same database
same function
with built-in lithium battery
light weight
both can be controlled by Xhorse app
Differences:
- Adjustable HD Touch Screen
XP005L: Yes, operate via touch screen directly or operate via Xhorse App on mobile phone/key tool max/key tool plus. New UI interface, easy & smart to control. Supports 0-90 degrees angle adjustment, 5 inch high definition tablet screen to minimize eye fatigue.
XP005: No

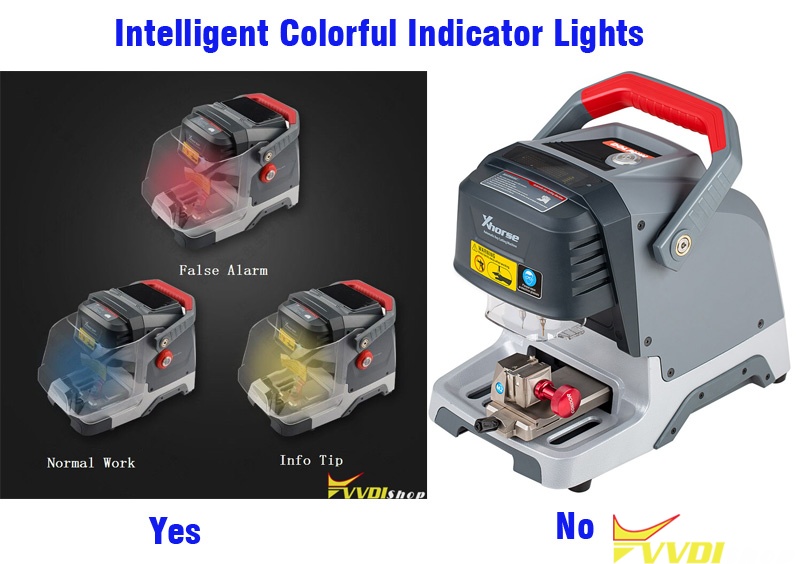
- Intelligent Colorful Indicator Lights
XP005L: Yes,
The indicator light changes color according to different real-time working status.
Red light – false alarm/error warning
Blue light – normal operation
Yellow light – information notification
XP005: No
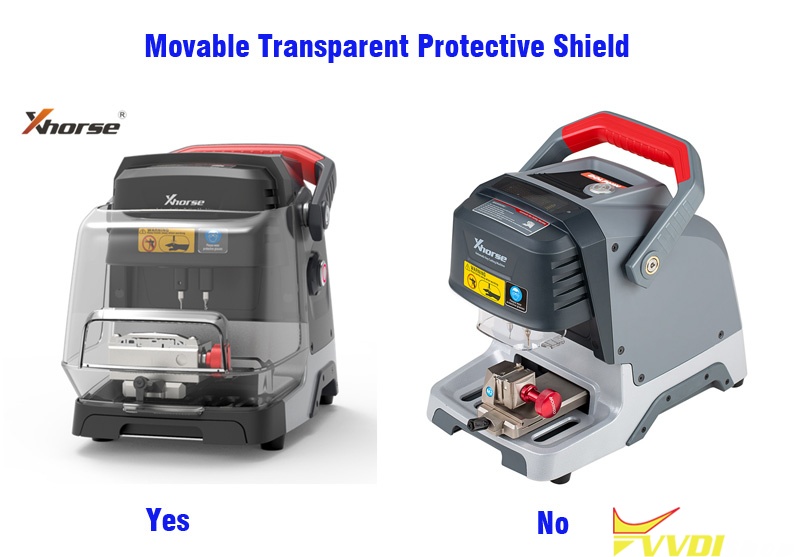
- Movable Transparent Protective Shield
XP-005L: Yes, More neater and safer. Clearly shows key cutting status all the time, prevents metal debris from spattering during processing.
XP005: No
- Upgrade Lengthen Working Space
XP005L expands cutting space to keep stable & secure, more reliable and powerful.
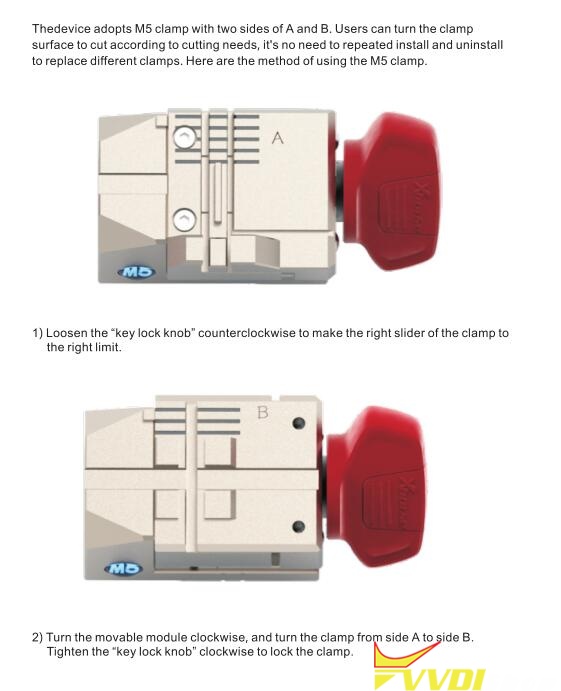
- Clamp
Dolphin XP-005L comes with M5 2 in 1 clamp in default. M5 clamp= M1 + M2 clamp. M5 clamp can be used with Dolphin II and Condor Mini Plus II only.
XP005L is compatible with old M1 and M2 fixture as well. But XP005 is not compatible with M5 clamp.

M5 Clamp instruction
Test Xhorse Dolphin XP005 Probe and Cutter Conductivity
Here is the tip on detecting abnormal conductivity of xhorse dolphin xp005 key cutting machine probe and milling cutter.
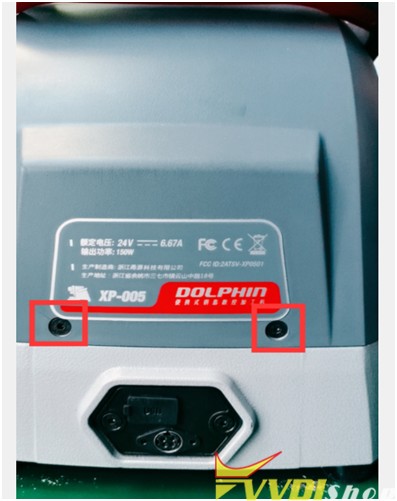
Step 1: Disassemble the back cover, and be careful of the wiring harness of the cover when disassembling
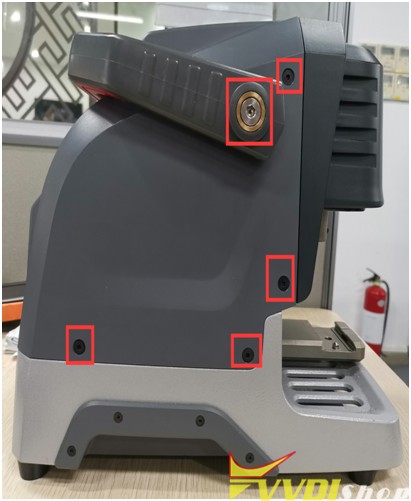
Step 2:
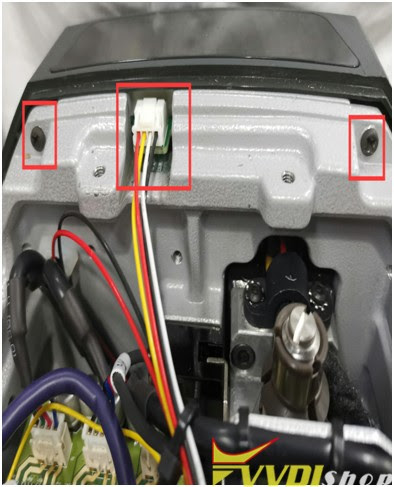
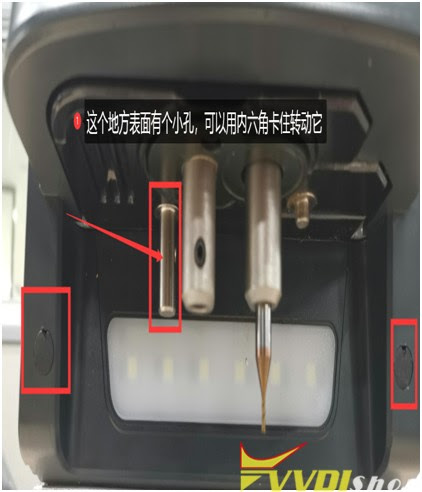
Remove the back cover, you can see these things, take off the wire harness, and remove the Phillips screws (see Figure 1). Take out the rubber pellets from the front of the device. There are screws inside. This strip needs to be removed (Figure 2)
(Figure1)
(Figure2)
Step 3:
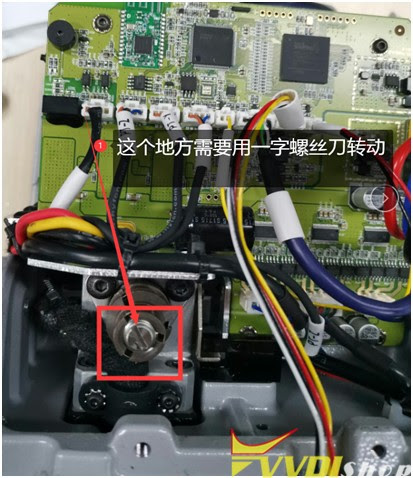
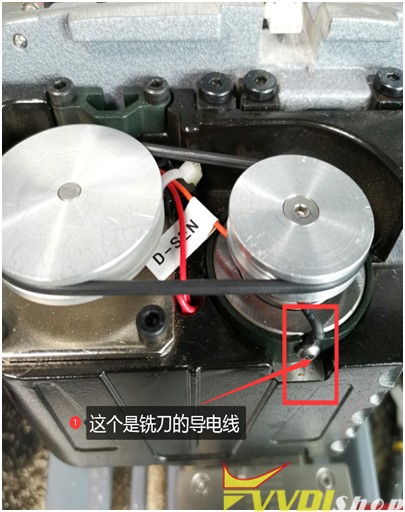
Use a flat-blade screwdriver to turn the lead screw, align the Z-axis and the outer cover on a horizontal surface (as shown in Figure 3 and Figure 4), remove the Z-axis housing after alignment (as shown in Figure 5), and place the probe next to it. Remove the screws (as shown in Figure 6). Remember to be careful when removing it. There is a conductive wire inside (as shown in Figure 7).
(Figure3)
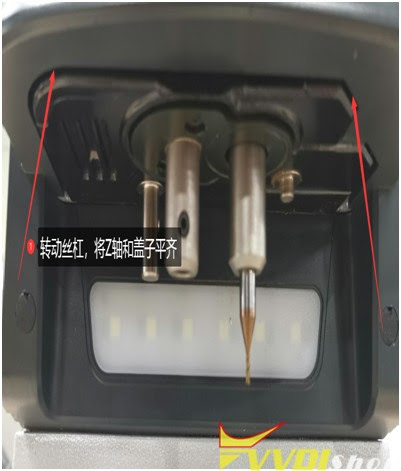
(Figure4)
(Figure5)
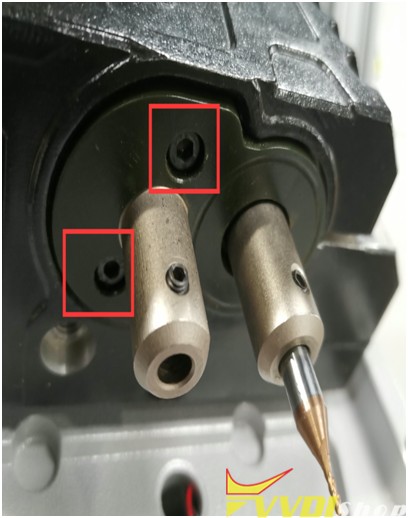
(Figure6)
(Figure7)
Step 4:
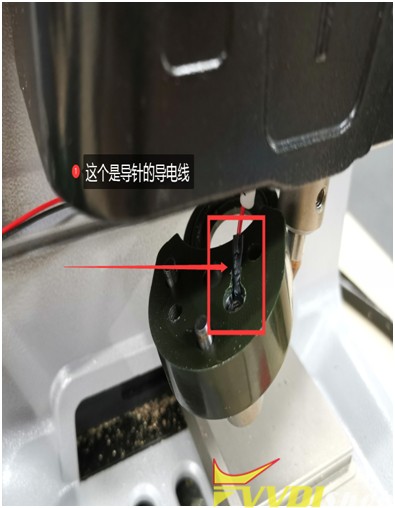
If the above steps are all done, the next step is to check whether the conductive wires of the milling cutter and the probe are conductive or short (as shown in Figure 5 and Figure 7), which needs to be combined with the main board to detect. (Figure 8) (or plug in the cable on the main board, and then check whether the conductivity is normal)
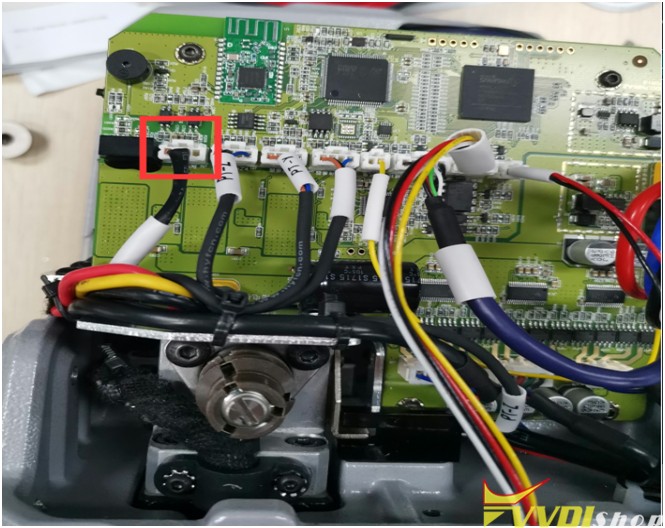
(Figure8)
Step 5: (conductivity of cutter): Loosen the 3 screws of the Z axis (as shown in Figure 9), and then tighten the two screws (as shown in Figure 10). Push these two screws to the inside until there is a gap. This is to take out the shaft (as shown in Figure 11), press your finger on the position of the milling cutter hole, and push it up with a little force. Come up, and then observe whether the white paper inside is broken (as shown in Figure 12), if it is broken, it needs to be replaced. If it is not broken, observe whether there is iron filings in the bearing hole
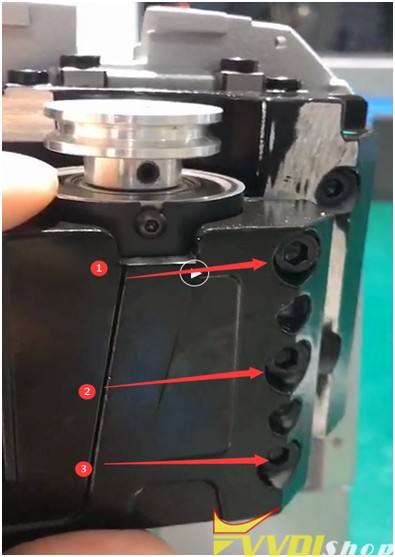
(Figure 9)
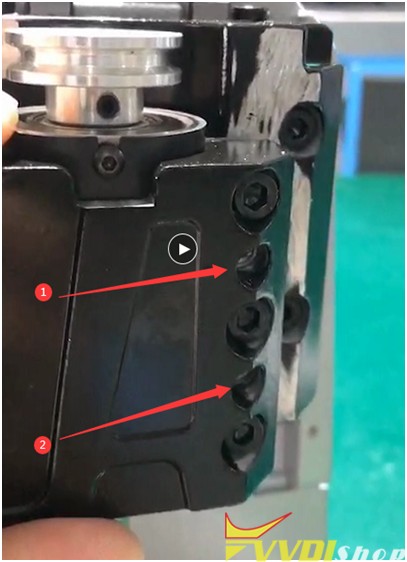
(Figure10)
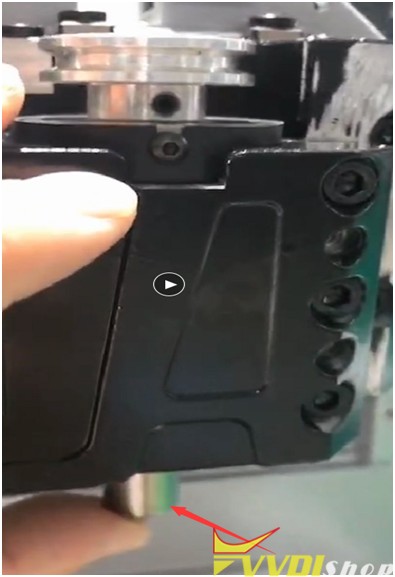
(Figure11)

(Figure12)
Any questions feel free to contact us.
https://www.vvdishop.com/service/test-xhorse-dolphin-xp005-probe-cutter-conductivity.html
Xhorse Dolphin XP005 cut Volvo NE66 Key
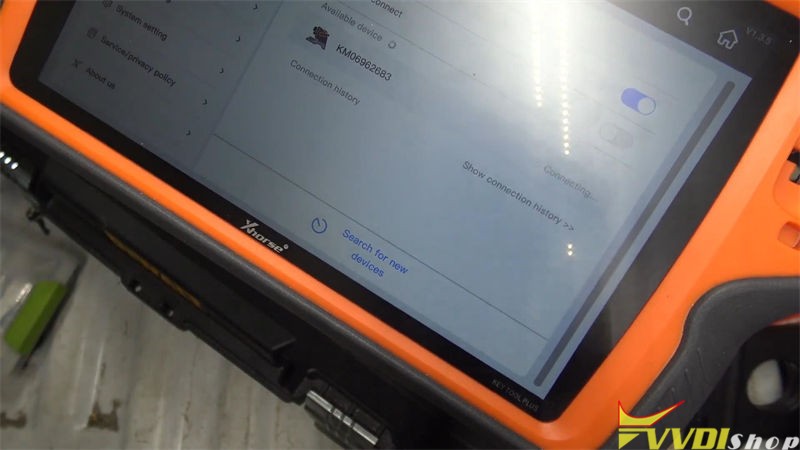
Just got a new device Xhorse VVDI Key Tool Plus recently, so today I wanna test it to control Dolphin XP005 Key Cutting Machine to cut a Volvo NE66 key.
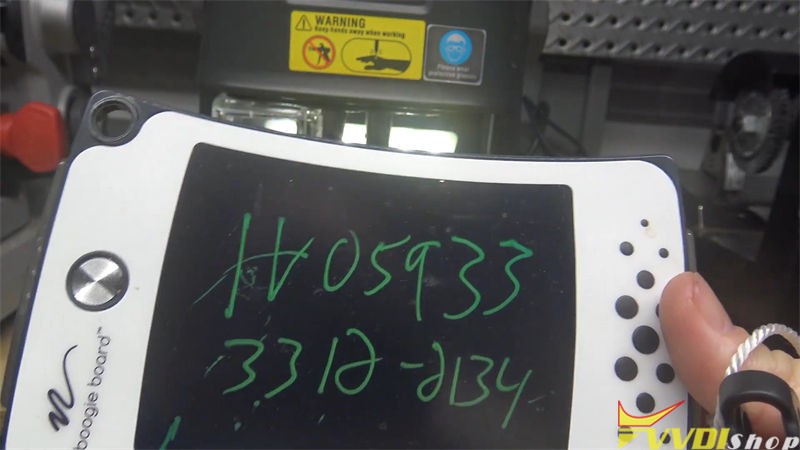
Firstly you should get the bitting key code, it’s H05933, 3312-2134.
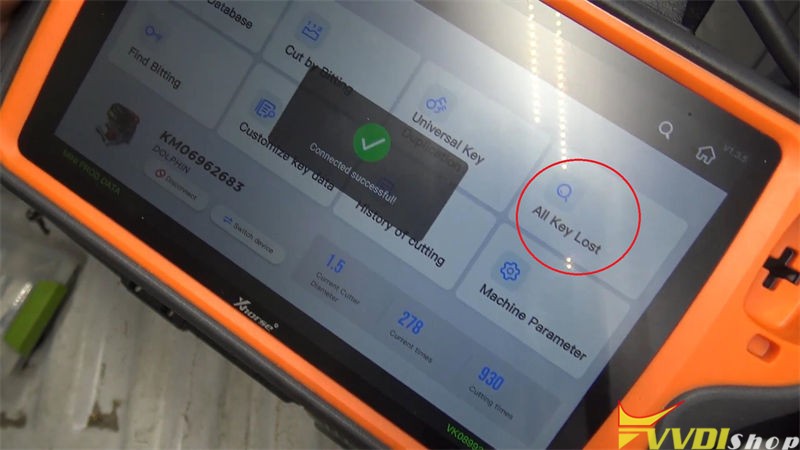
After connecting Key Tool Plus with Dolphin XP005, press
Cutting key >> All key lost >> Volvo >> Input key code, query >> NE66, 4-4 bitting

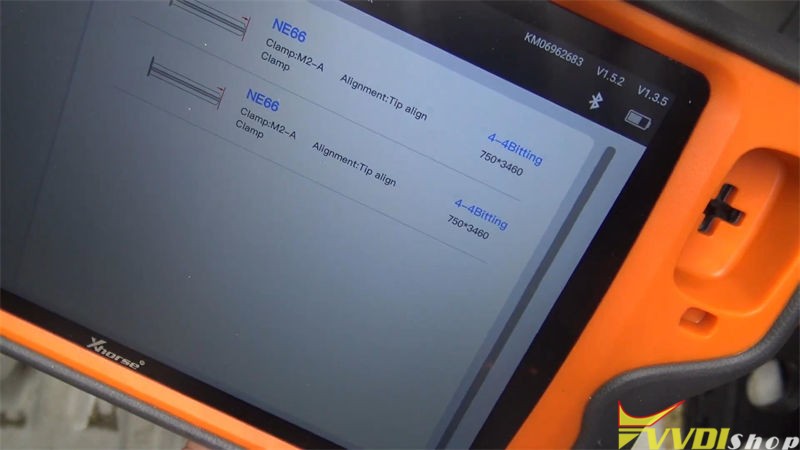
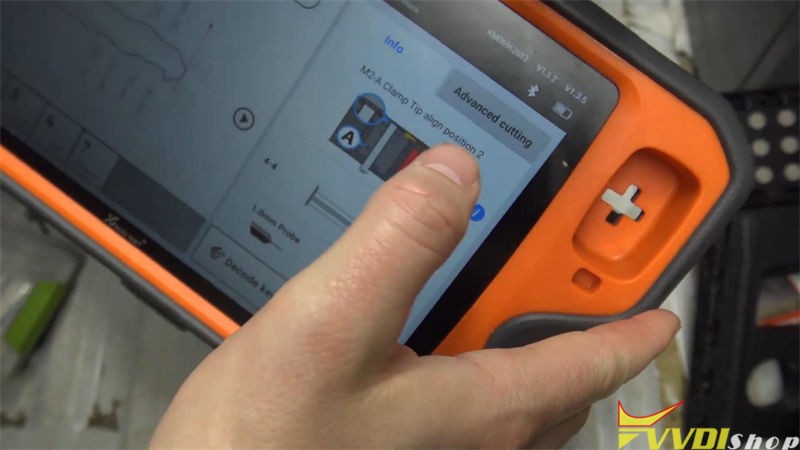
It shows the key bitting and requires to install M2-A clamp tip align position 2.
Fix the key blank on M2 clamp firmly, press “Cut”.
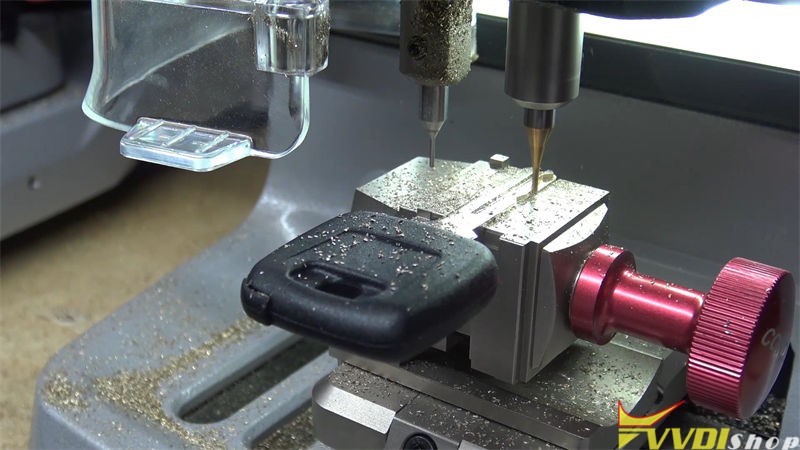
Dolphin XP005 machine starts cutting…
Wait cutting finished.
Then turn over to cut the other side.
Press “Cut” to wait…
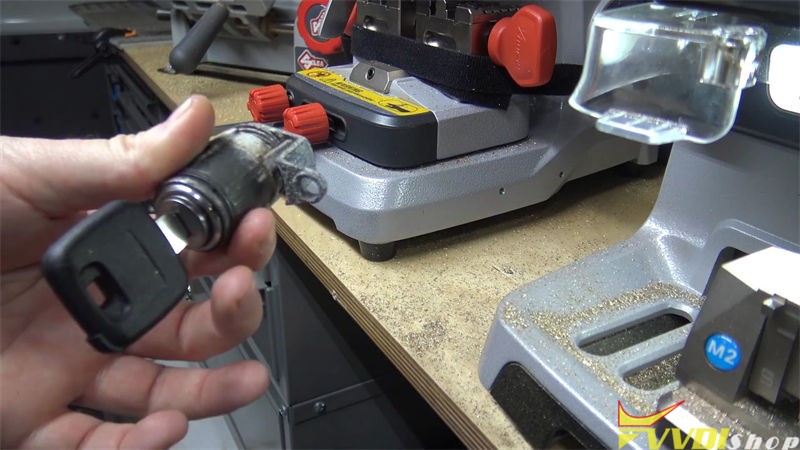
Alright, completed!
Let’s try it in the door lock, it can work smoothly.
Done!
This is using VVDI Key Tool Plus to control Dolphin XP005 to cut NE66 when all key lost. It also supports to smart control other Xhorse machines like Condor XC-Mini Plus, XC-Mini and Panda.
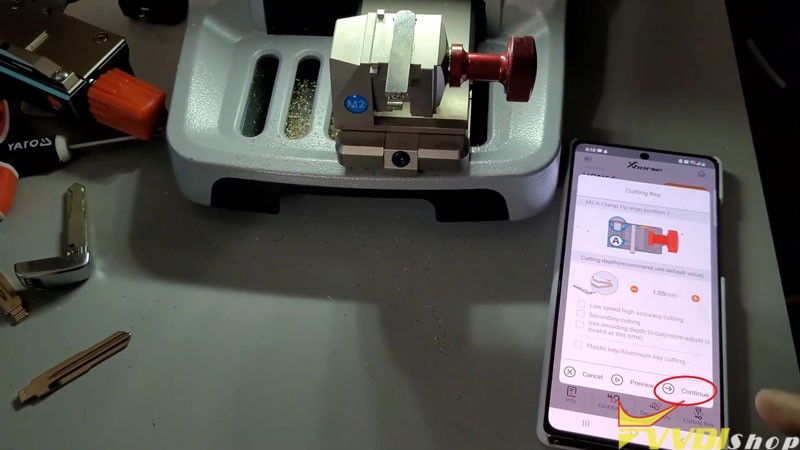
How to Cut Hon66 Laser Key by Xhorse Dolphin XP-005?
Today I’m gonna show how to use Xhorse Dolphin XP005 + VVDI Key Tool Max to copy a HON66 laser key.
Prepare a Honda original key & a new key blank.
Connect Key Tool Max with Dolphin XP005 via Bluetooth to smart control.
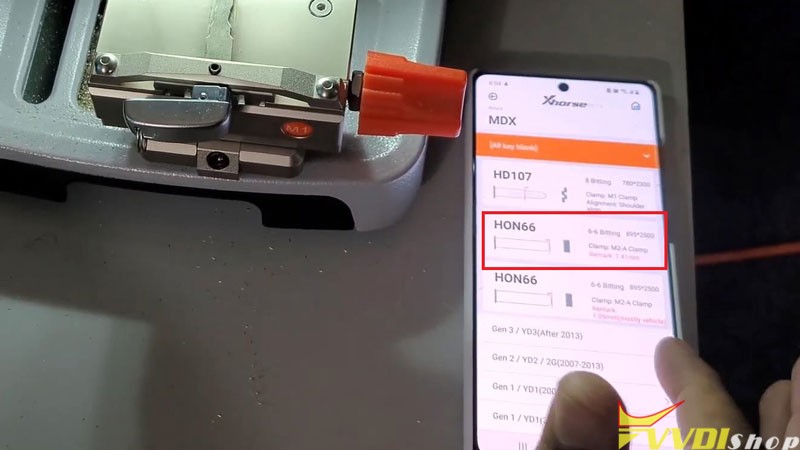
Vehicle database >> Acura >> MDX >> HON66 >> OK
Install M2 clamp, and fix the original key on it as prompts.

Decode key >> Continue
The Dolphin XP005 Machine starts coding key…
Wait until coding completed.
Take out the key to replace a key blank to fixed it on.
Go to Key Tool Max,
Cutting key >> Continue
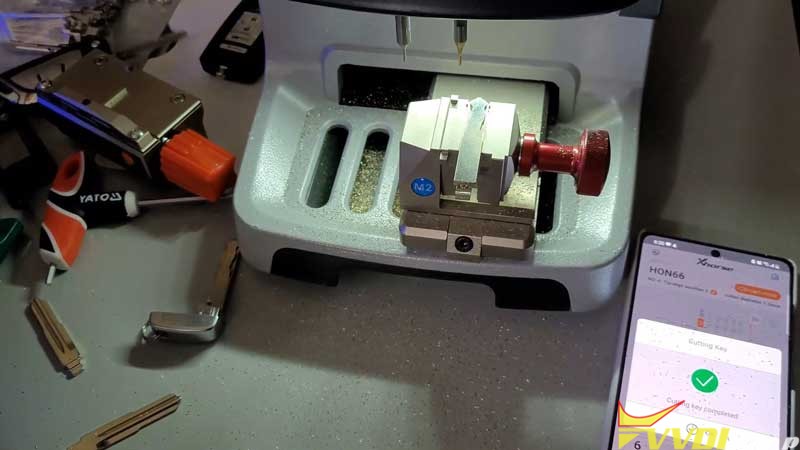
Dolphin XP005 machine starts to cut the key…
One side cutting is finished.
Turn over the key blank to cut the other side.
Just repeat operations as before.


…
Okay, finally key cutting is done.
Look at that new key, it matches perfectly, same as the original one.
It can open the car door.
Completed!

This is a quick tutorial on using Dolphin XP005 key cutting machine to cut a HON66 key.
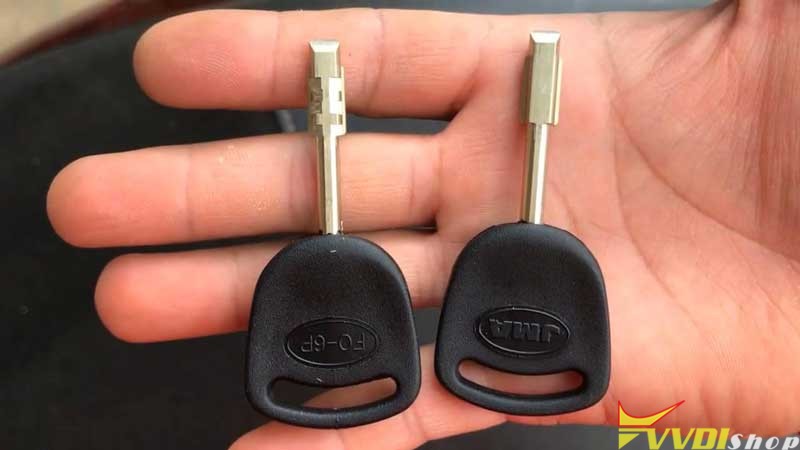
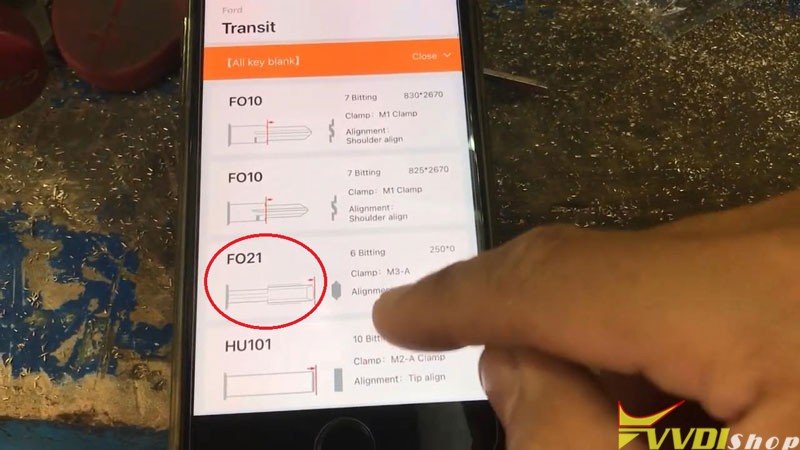
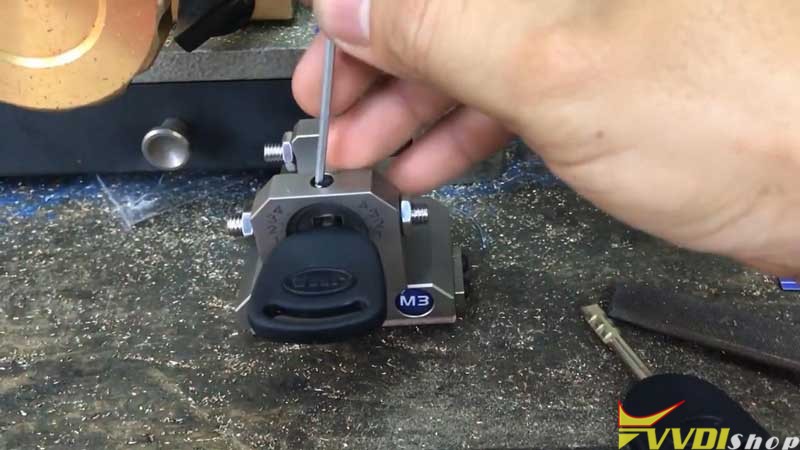
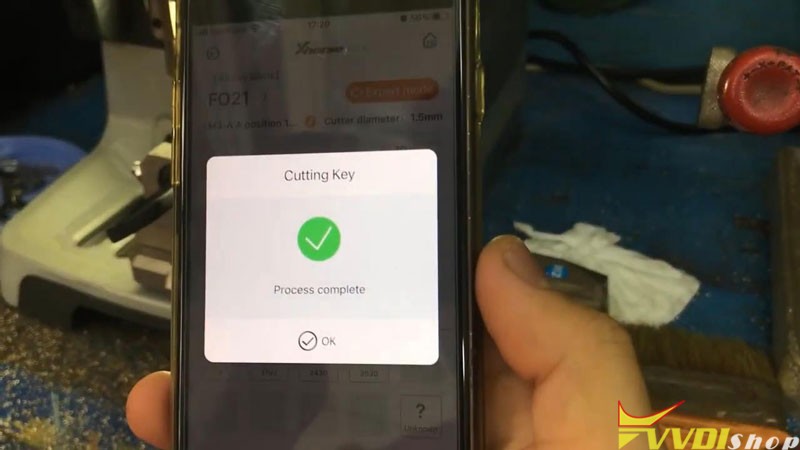
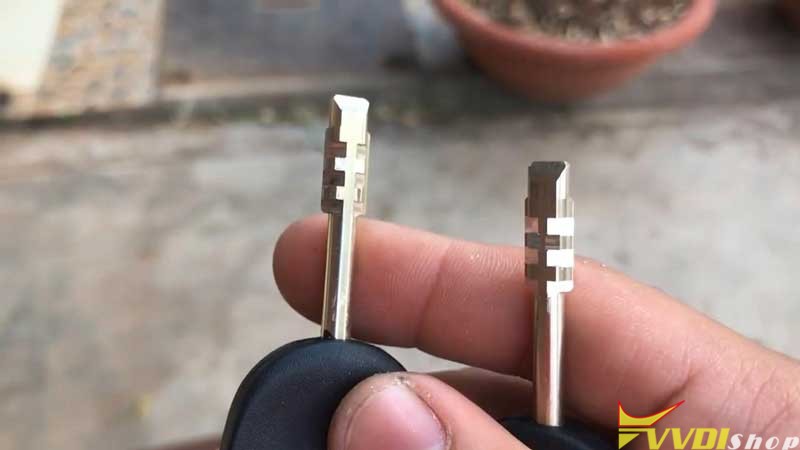
Dolphin XP005 to Cut Ford Transit FO21 Key
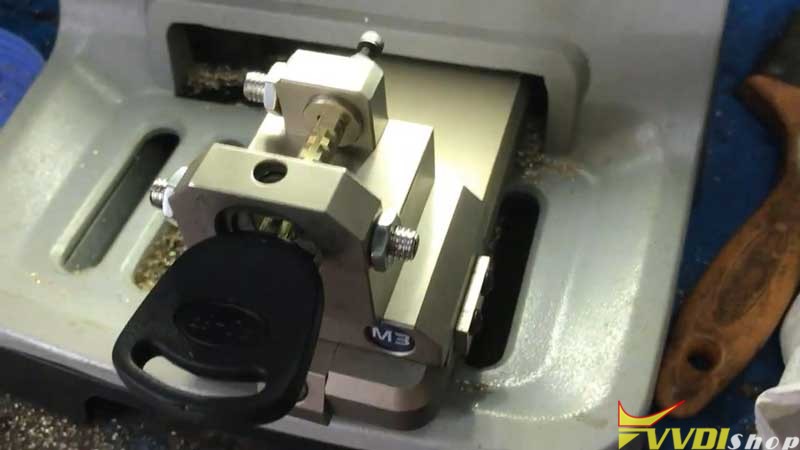
Use Xhorse Dolphin XP005 Key Cutting Machine installing with M3 Fixture Clamp can cut FO21 key for Ford Transit. This is a quick demonstration about how to cut.
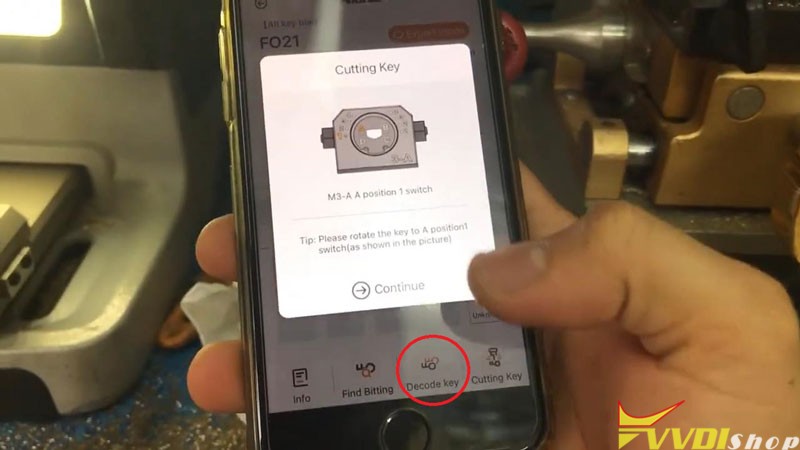
Decode Key
Here are 2 keys: original key & new key blank.
Insert the original key into M3 clamp, fix the clamp on machine firmly.
Go to Xhorse app to control, press
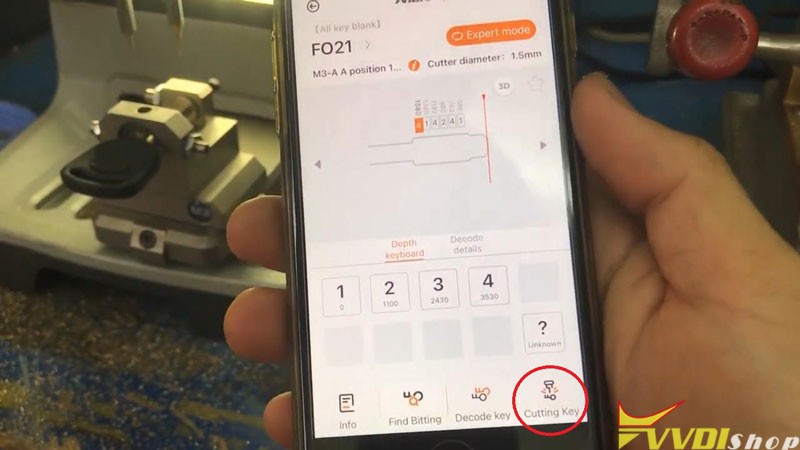
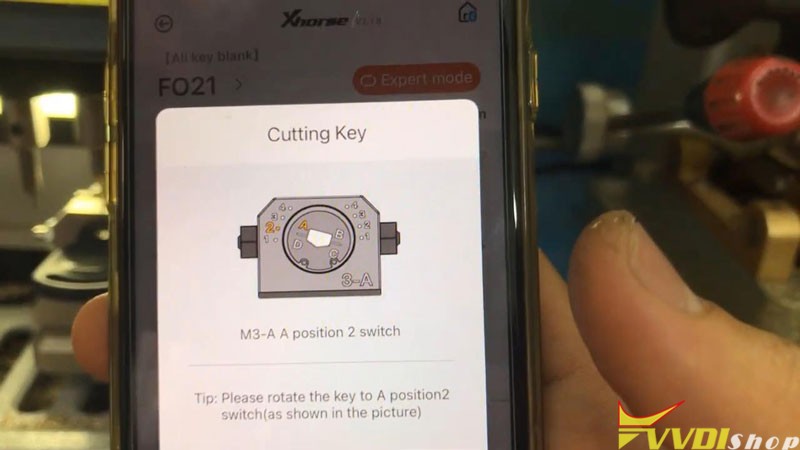
Vehicle database >> Ford >> Transit >> FO21 >> OK >> Decode key
Follow the notes to operate:
Rotate the key to A position 1 switch(as shown in the pic), press “Continue”.
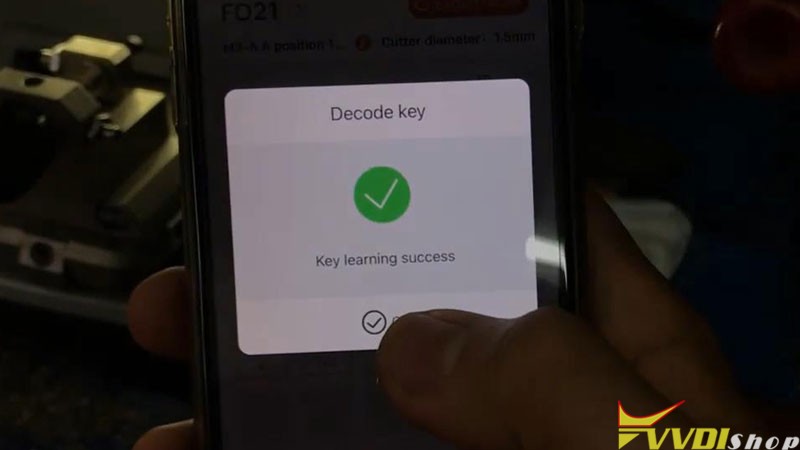
Dolphin XP005 machine starts decoding…
Key learning success.
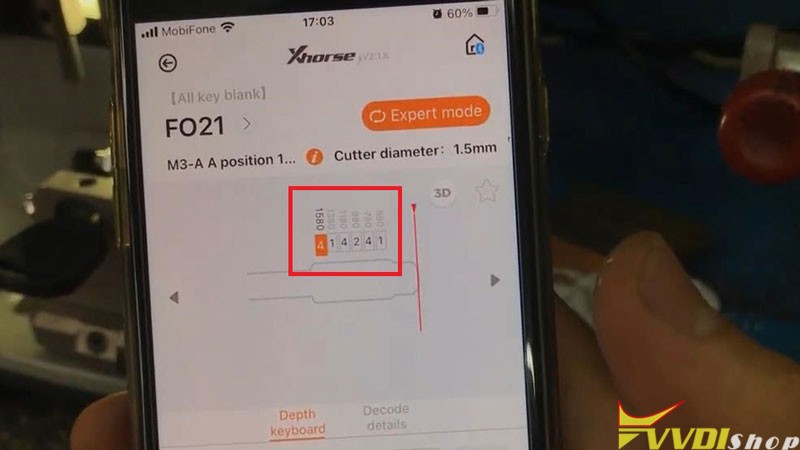
The key bitting codes will be shown as well. It is 414241.
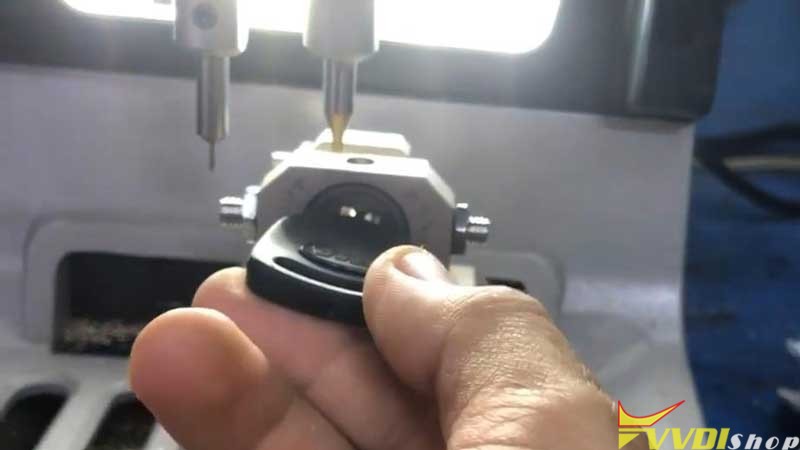
Cut Key
Remove the original key to fix a new key blank in clamp, press
Cutting key >> Continue
Dolphin XP-005 machine starts cutting…
Note: It will prompt several times to switch key, just follow the steps to operate.
Rotate the key to A position 2 switch.
Rotate the key to A position 4 switch.
Rotate the key to B position 2 switch.
Rotate the key to B position 4 switch.
Rotate the key to C position 1 switch.
Rotate the key to C position 2 switch.
Rotate the key to C position 4 switch.
Rotate the key to D position 2 switch.
Rotate the key to D position 4 switch.
Process complete.
Take out the key to have a try.
It is actually same as the original one, and it can open the lock.
Key cutting has done!
More questions welcome to contact us.