ابزار Xhorse VVDI
Xhose VVDI نرم افزار برنامه نویس اصلی و سخت افزارابزار Xhorse VVDI
Xhose VVDI نرم افزار برنامه نویس اصلی و سخت افزارHow to do Xhorse Dolphin electrical conductivity?
If the Xhorse Dolphin XP005 Key Cutting Machine does not do electrical conductivity measurement, you may meet problems like the cutter was broken when cutting keys every time.
How to do electrical conductivity measurement for Dolphin XP-005?
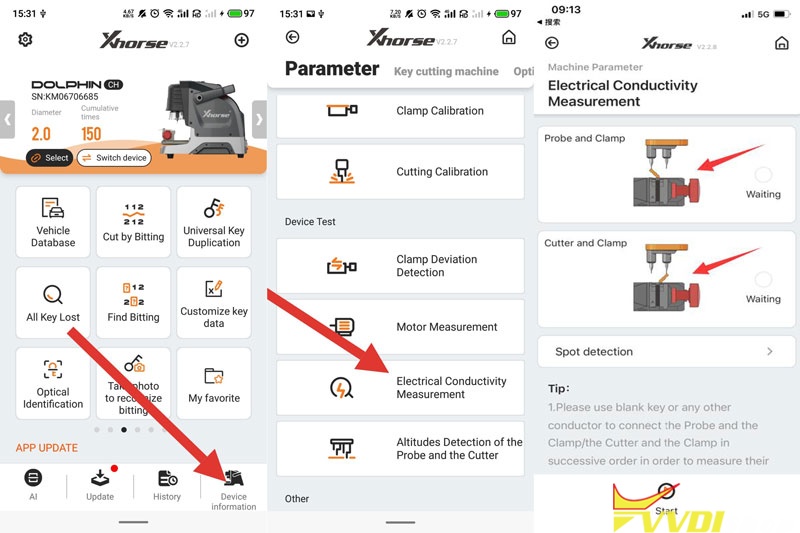
Go to Xhorse app,
Device information >> Electrical conductivity measurement
- Probe and clamp
- Cutter and clamp
Please use blank key or any other conductor to connect the probe and the clamp/ the cutter and the clamp in successive order, to measure their electrical conductivity(as shown in figure). If the electricity conducts through the conductor, the green light turns on.
Just follow the tips to operate, press “Start” to perform actions in order.
https://www.vvdishop.com/service/xhorse-dolphin-xp005-electrical-conductivity-measurement.html
How to Check Xhorse Condor Power Board Damage?
One user met a problem that his Xhorse Condor XC-Mini Plus machine cannot start, even if the machine was updated to latest version, USB light is on, the issue still remains.

At this point, engineer should have to troubleshoot if the Condor XC-Mini power board was damaged.
How to check if Condor XC-Mini power board is damaged?
- Place down the XC-Mini Plus machine, take out screws as pic shown;

- Take out the power board to check output voltage, check if it is 24V in red circle position;
- If not, check if the input voltage in arrow position is 110/220 V.
If input voltage is normal, which means the Xhorse Condor Mini Plus power board is damaged.
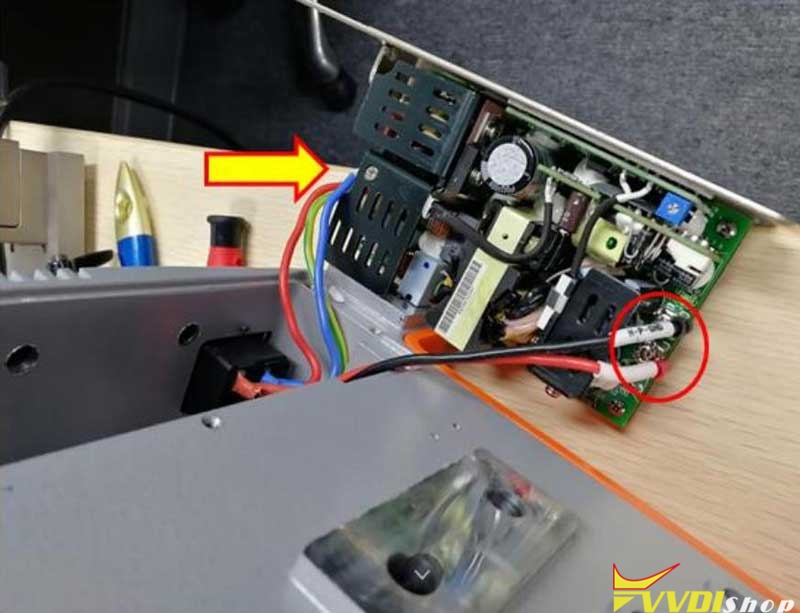
Give your check result to Xhorse engineer to help solve problem.
Can Xhorse VVDI2 Exchange BMW FEM BDC Module?
The answer is Yes. BMW F chassis FEM/BDC module should be exchanged in case it was damaged due to misoperation when matching keys or repairing. Using Xhorse VVDI2 to replace FEM/BDC module directly will be much faster and economical.
How to exchange BMW FEM/BDC by VVDI2?
Step1. Preparation
Find a same year & model of FEM/BDC as the damaged one, new or secondhand is workable.
FEM/BDC module requires programming before exchange, the way to program new module is same as key matching.
Connect FEM/BDC with VVDI2 programmer on car/ bench for programming.
(It will prompt if the FEM/BDC should be programmed, if not, please go to step3 “Exchange FEM/BDC” directly)

Step2. Programming FEM/BDC System
FEM/BDC key learn >> Get key info >> Programming FEM/BDC system
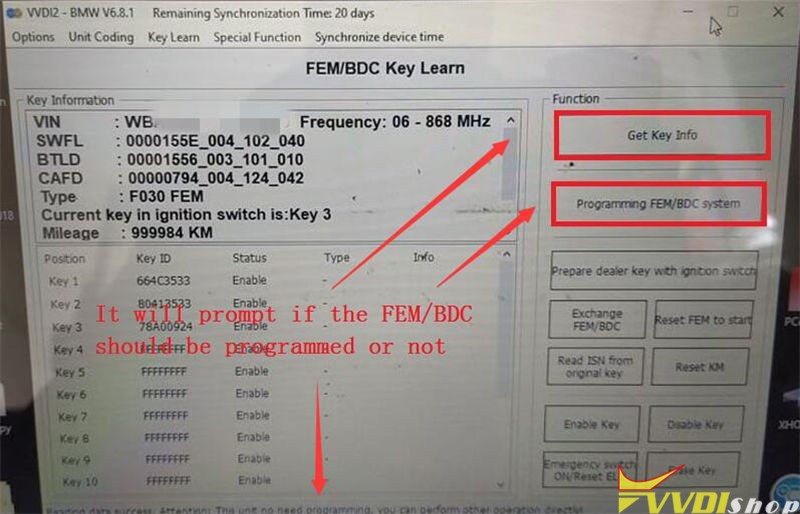
Follow the notes to operate step1 – step5:
Backup coding >> Prepare service EEPROM file >> Programming >> Restore original EEPROM file >> Restore coding

Step3. Exchange FEM/BDC with VVDI2 BMW
Go to “Exchange FEM/BDC” after programming completed.

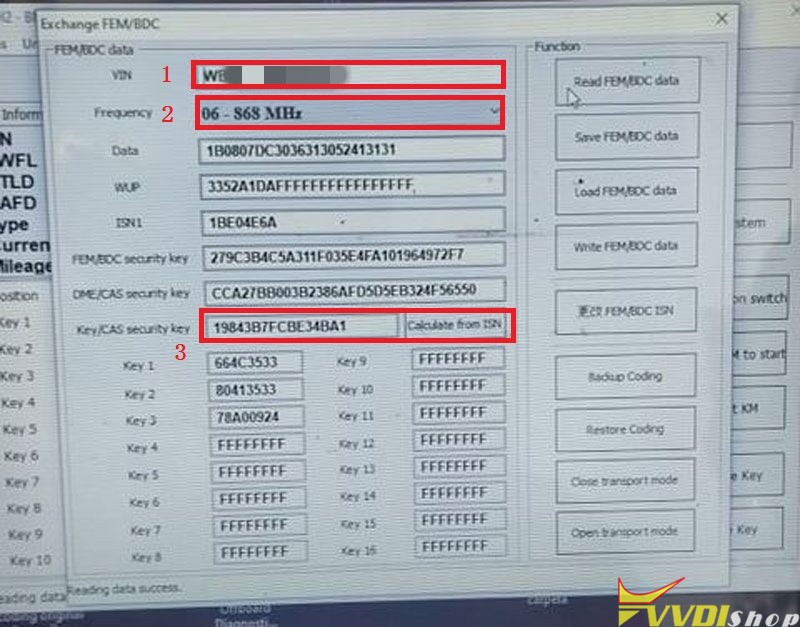
Read FEM/BDC data >> Revise 3 options including:
- VIN, the VIN of damaged FEM/BDC;
- Frequency(The remote will not work if selecting wrong frequency);
- Key/CAS security key, fill in the original vehicle ISN(it can be acquired by reading engine data)

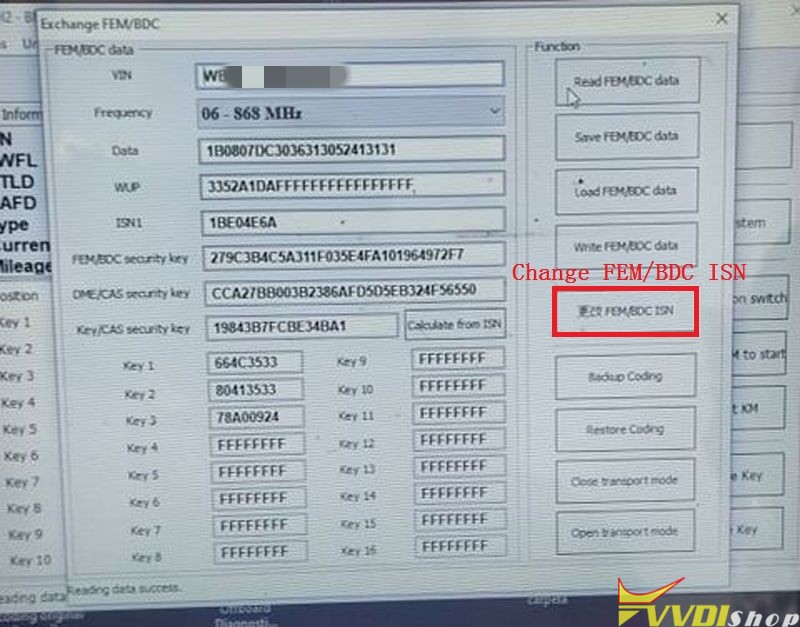
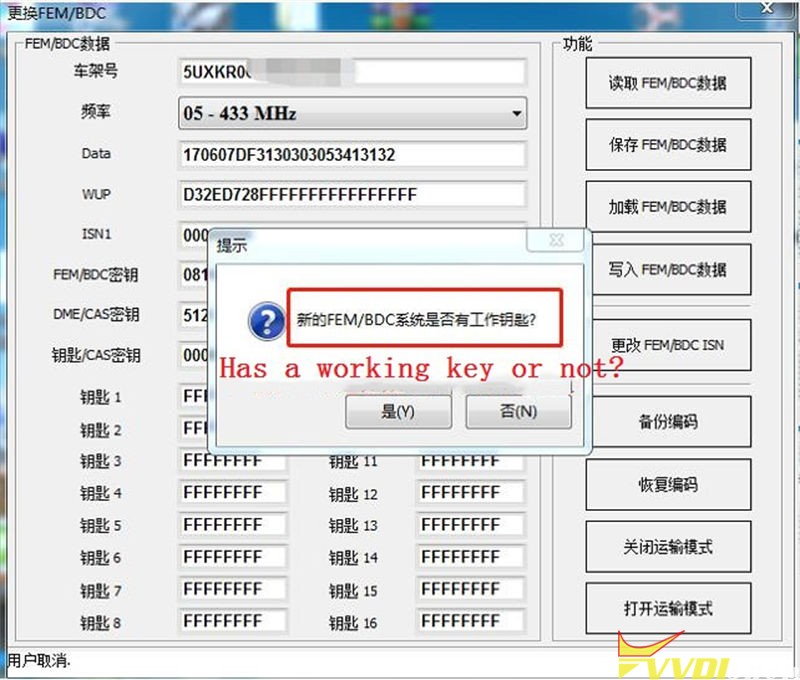
Change FEM/BDC ISN >> Yes >> Has a working key or not? No(select according to situation) >> Input the original vehicle ISN(the damaged one, no secondhand FEM/BDC ISN) >> Next >> Write FEM/BDC data


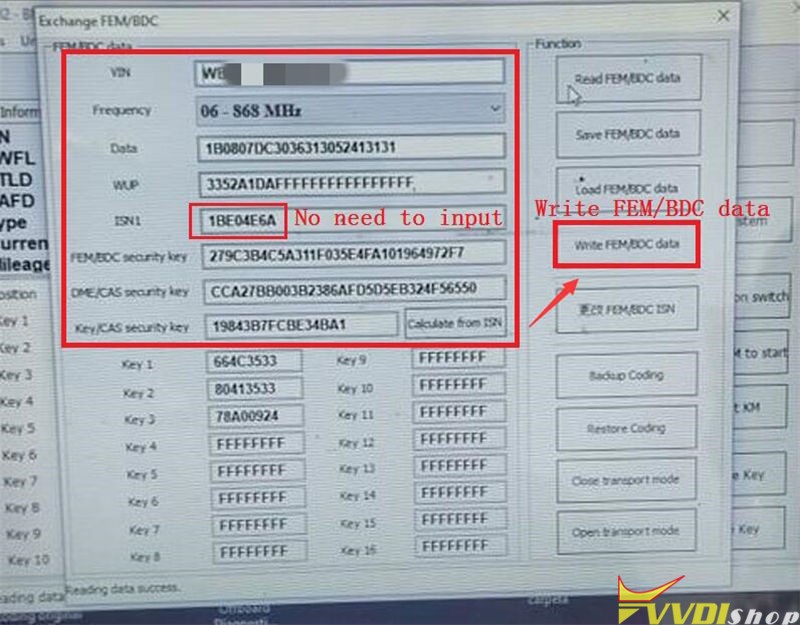
After writing data completed, FEM/BDC exchange match has done!
In general, same model & year of FEM/BDC can work normally after replacement.
If there were error codes, please use professional tool to do programming and coding.
Note: Some BMW like MINI or X1 cannot turn on ignition & dashboard after FEM/BDC replacement, that is because the directional lock is not synchronized. Just disassemble the directional lock to revise data for synchronization, it can work as normal.
https://www.vvdishop.com/service/exchange-bmw-fem-bdc-module-with-xhorse-vvdi2.html
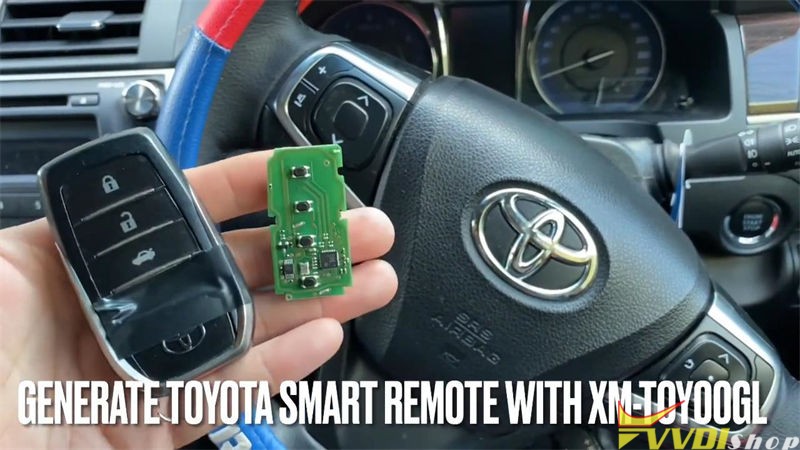
Program Toyota Camry 2015 XM Smart Key with VVDI Key Tool Plus
How to to program a XM Smart Key for Toyota Camry 2015 with Xhorse VVDI Key Tool Plus Pad? Having got a working key, here we go to show the steps below.
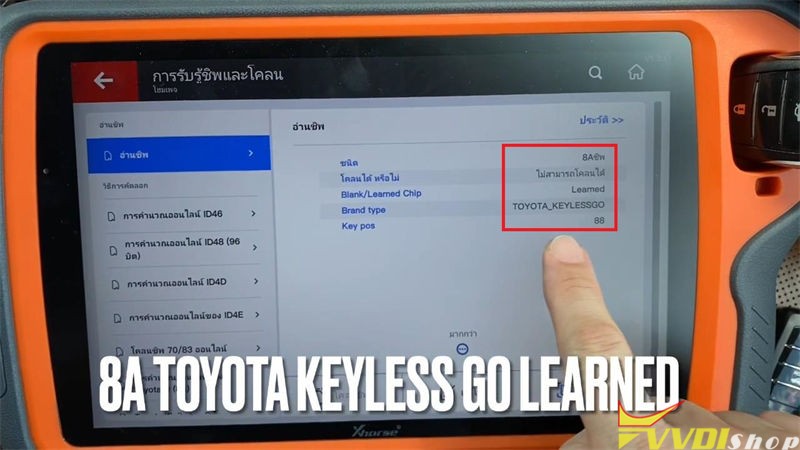
After connecting VVDI Key Tool Plus with OBD, let’s check the working key first.
It is a 8A Toyota keyless go learned working key, FSK 312.1 MHZ/ 314.35 MHZ frequency.
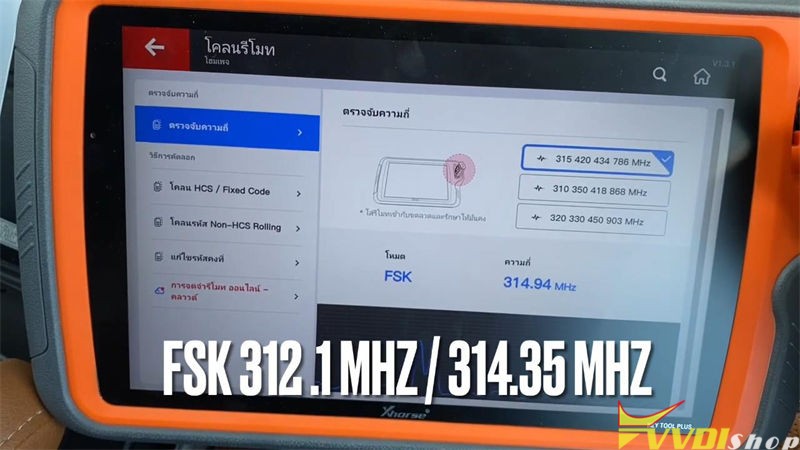
Generate Remote
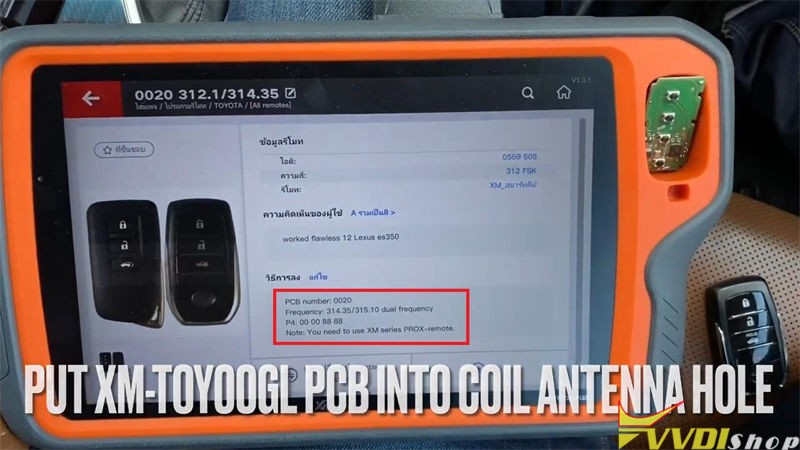
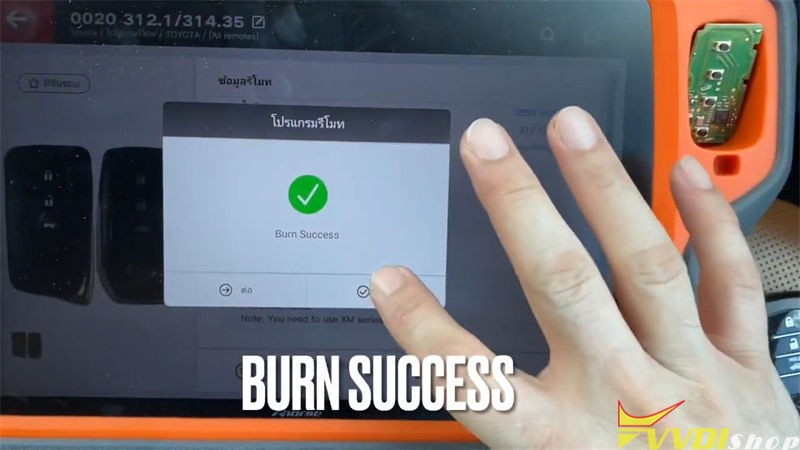
Remote program >> Toyota >> All remote >> 0020 312.1/314.35 FSK
Put the XM Toyota Smart Key into Key Tool Plus slot, press “Generate”.
The LED on XM PCK will be flashing.
Wait processing until 100%…
Burn success.
Put Xhorse XM Smart Key into Toyota shell.
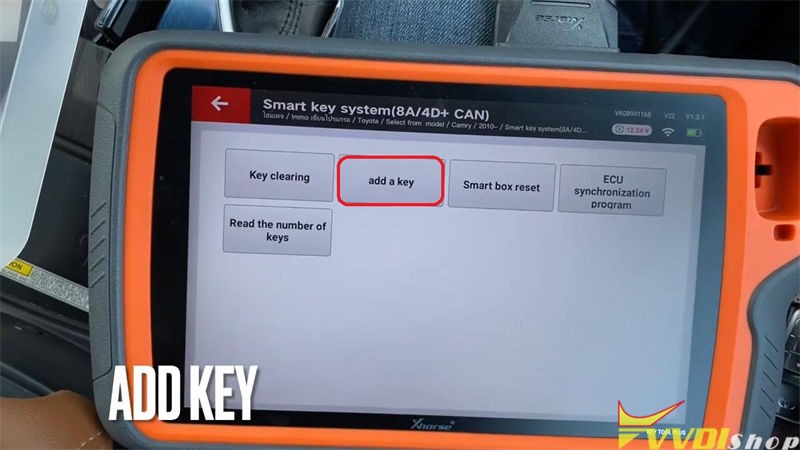
Add Key
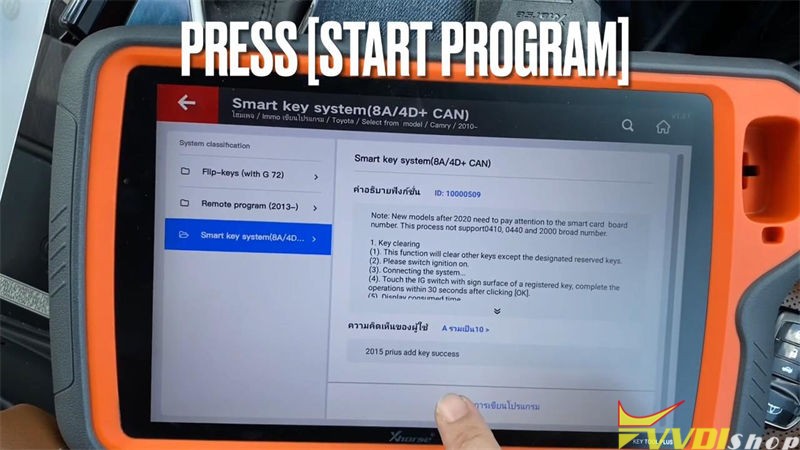
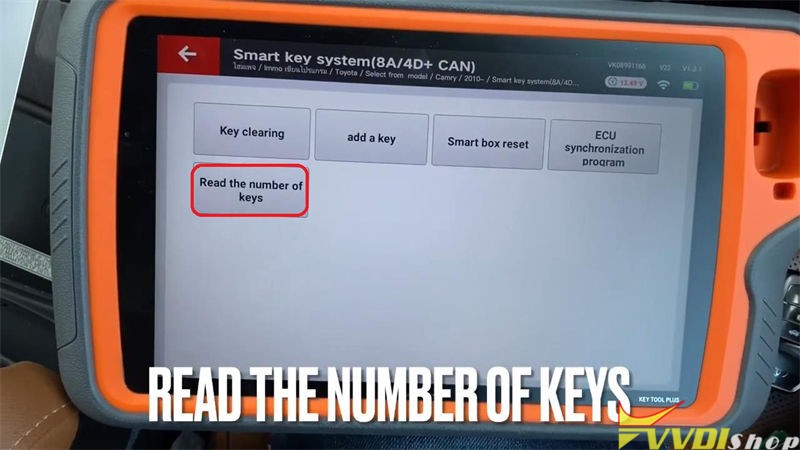
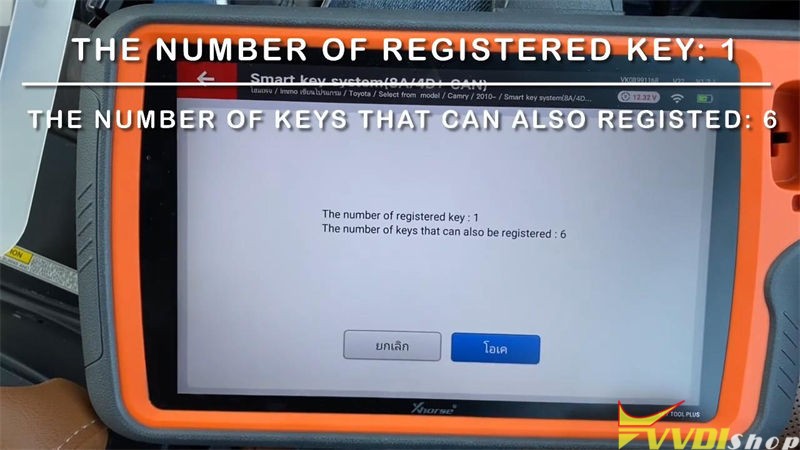
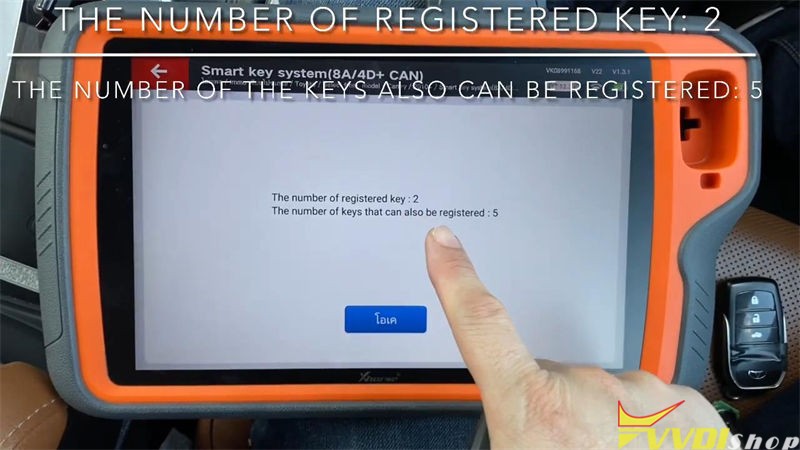
Immo program >> Toyota >> Select by model >> Camry >> 2010- >> Smart key system(8A/4D+ CAN) >> Start programming >> Read the numbers of keys
Switch ignition on.
The number of registered key: 1
Press “Add a key”.
Switch ignition on.
The number of registered key: 1
The number of keys that can also be registered: 6
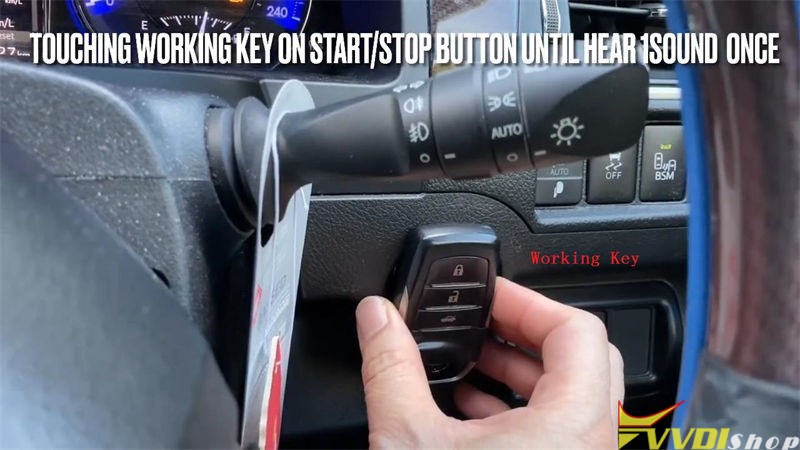
Keep touching the ignition switch with sign surface of a registered key(working key), complete the operations within 30s after clicking “OK”.
Keep touching the ignition switch with sign surface of the XM Toyota Smart Key within 30s.
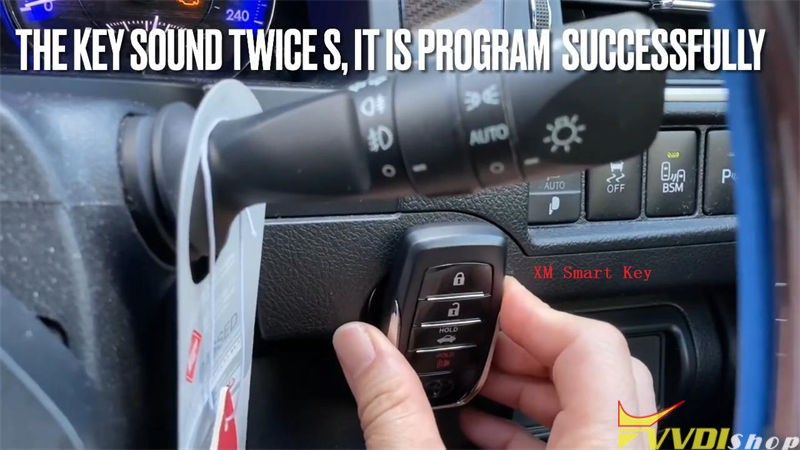
Note: if key sound once, take the key farther away. If key sound twice, it is programming successfully.
Keep the key touching the ignition switch…
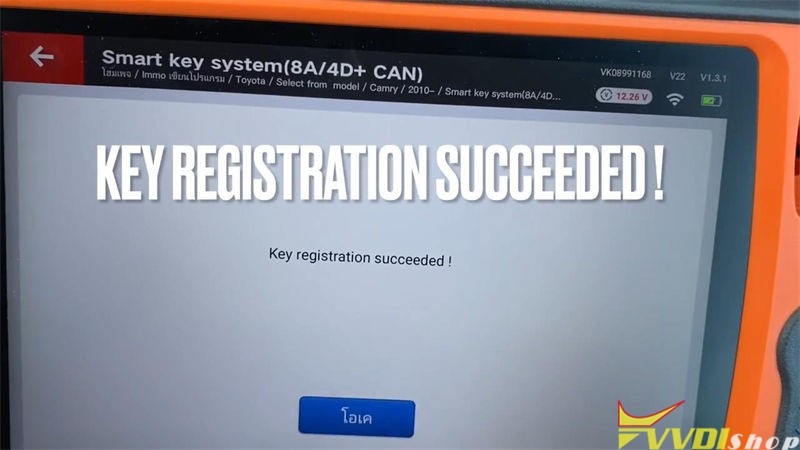
Key registration succeeded!
The number of registered key: 2
The number of keys that can also be registered: 5
Check if the functions of XM Smart Key are normal.
Remote function is OK, and it can start the engine.
Done!
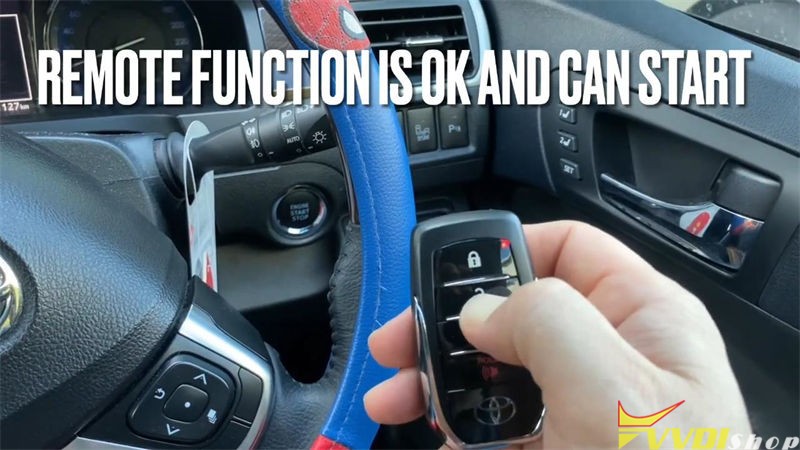
Added Xhorse XM Smart Key for Toyota Camry 2015 successfully. It supports 4D and 8A series, can be programmed by VVDI2, Key Tool Max & Mini Key Tool as well.
4 Steps to Install Xhorse Smart Key Box
What’s Xhorse Smart Key Box?
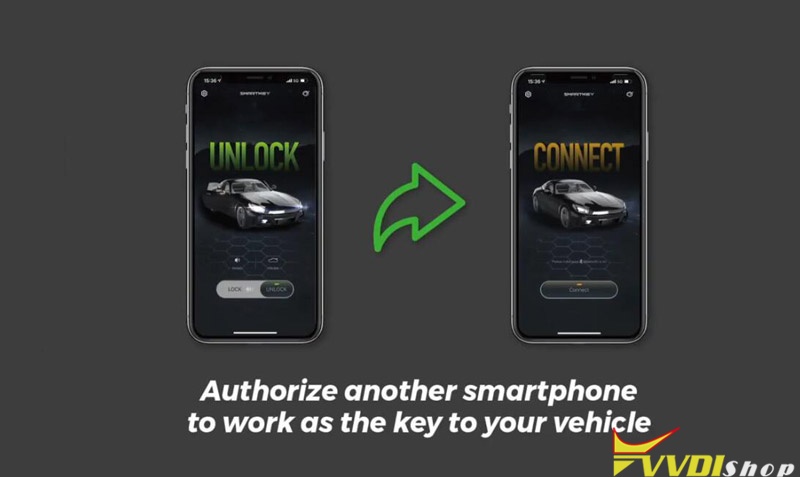
It is an adapter that can be used to access a vehicle using a mobile phone app via Bluetooth connection. With this adapter, you can add Bluetooth Connectivity to the Central Locking System / Keyless Entry System of any vehicle that you can configure an Xhorse Universal Remote to operate.
This adapter will allow wireless(via bluetooth) locking, unlocking, and remote start. Keep in mind that this adapter does not add any of these features to the vehicle. In order for this adapter to wirelessly lock, unlock, or remotely start the vehicle, these features have to already be functioning in the vehicle before the Xhorse Smart Key Box is installed.
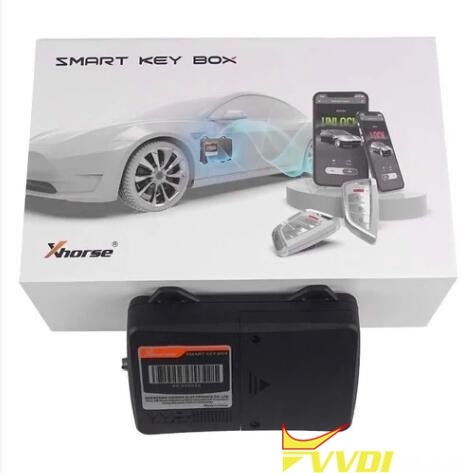
Compatibilities:
A maximum of 6 mobile phones and 6 smart keys are supported by this device.
What vvdi tools can be used to program remote control?
vvdi mini key tool, vvdi2, vvdi key tool max and vvdi key tool plus
How to use Xhorse smart key box?
1. Soldering the circuit board
2. Key learning
3. Install smart key box
4. Test

Step 1: soldering the key diagnonally
Soldering the original key into smart key box
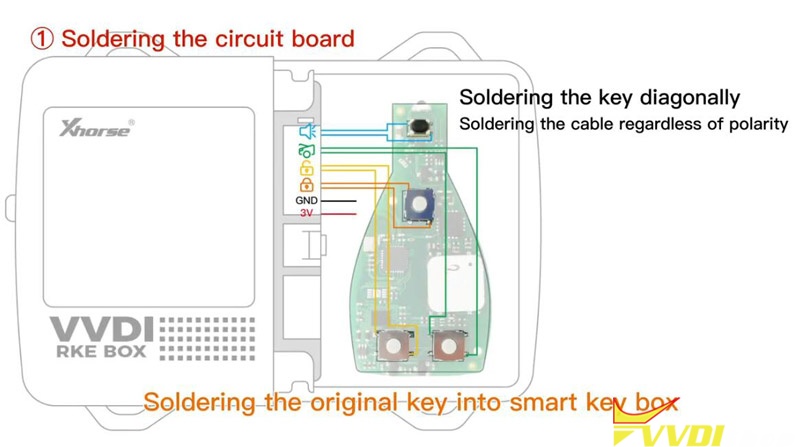
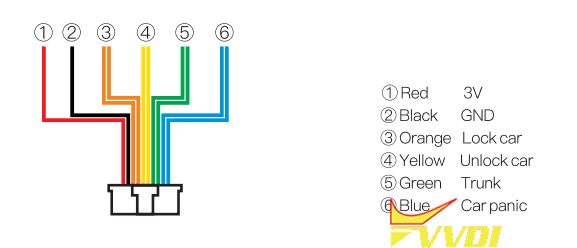
check the wiring diagram
Step 2:
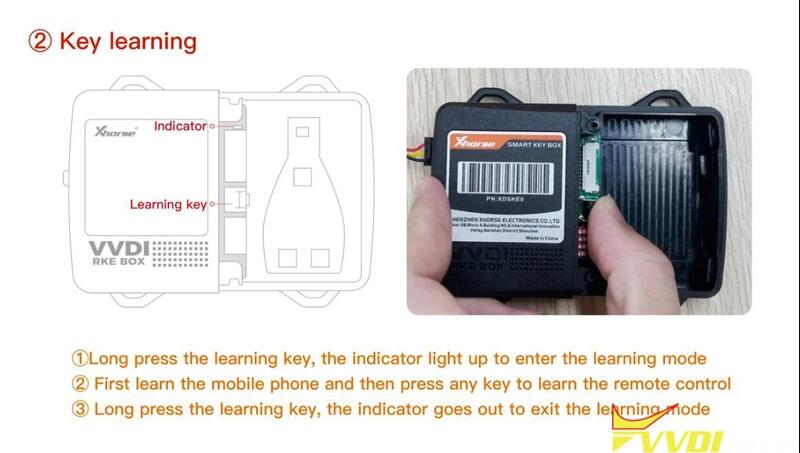
Long press the learning key, the indicator light up to enter the learning mode
First learn the mobile phone and then press any key to learn the remote control
Long press the learning key, the indicator goes out to exit the learning mode
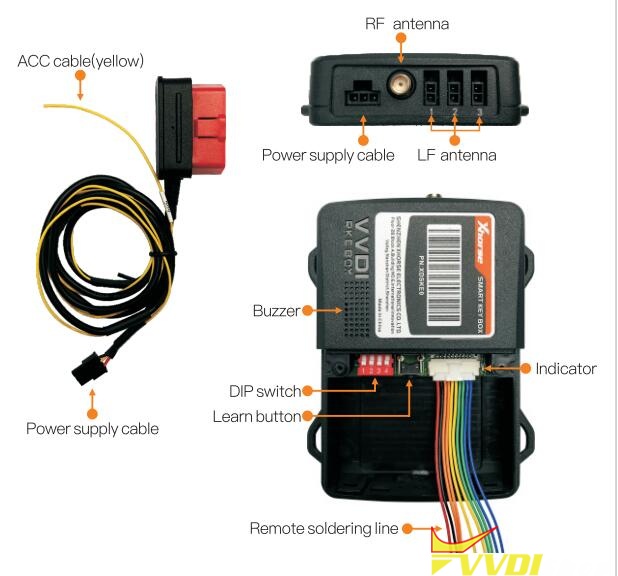
Step 3: Install smart key box
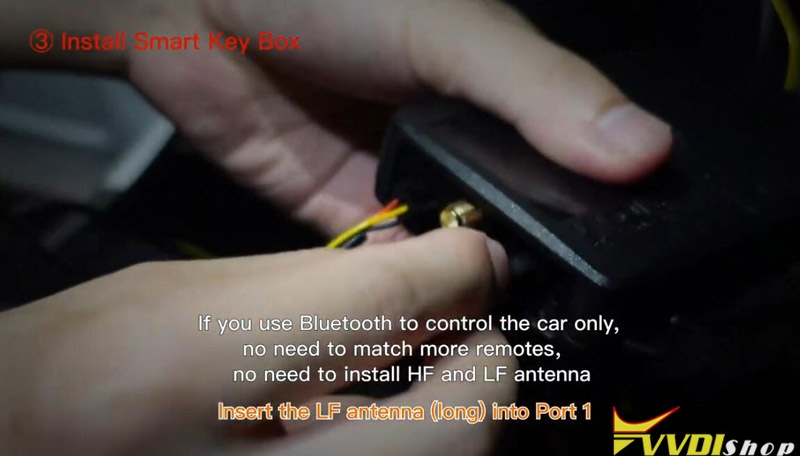
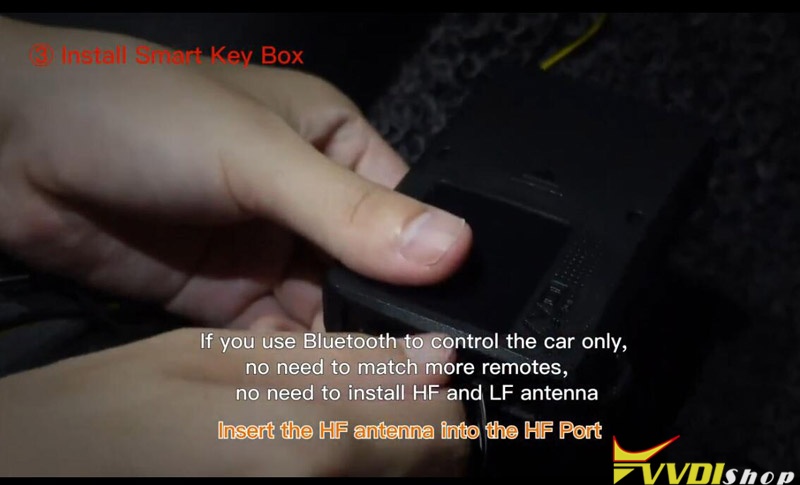
if you use Bluetooth to control the ar only, no need to match more remotes, no need to install HF and LF antenna
Insert the LF antenna (long) into Port 1
Insert the LF antenna (long) into Port 1
Insert the HF antenna into the HF port
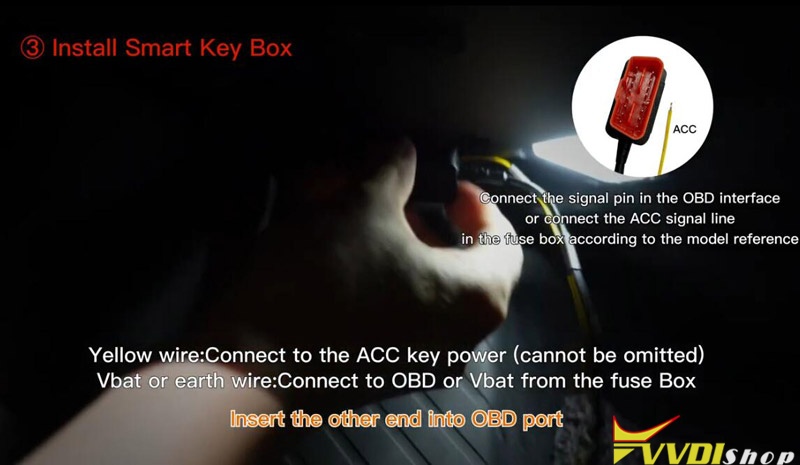
Connect one end of the power supply cable to smart key box
connect the signal pin in the OBD interface or connect the ACC signal line in the fuse box according to the model reference

Now test on car. Support panic and open trunk.
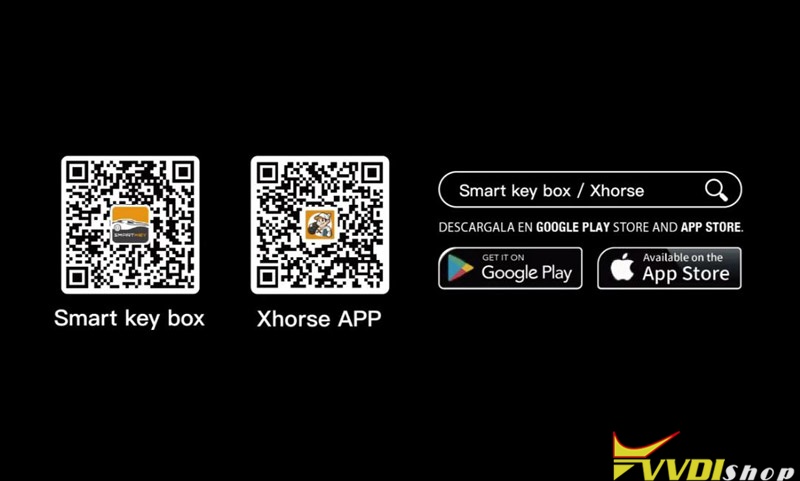
Scan QR code to check for information of smart key box.