ابزار Xhorse VVDI
Xhose VVDI نرم افزار برنامه نویس اصلی و سخت افزارابزار Xhorse VVDI
Xhose VVDI نرم افزار برنامه نویس اصلی و سخت افزارXhorse Dolphin XP005L Stuck on Firmware Update?
Problem:
Xhorse Dolphin XP005L can’t seem to get it to update any ideas? Straight out the box. Stuck on firmware update interface.

Solution:
Update: got it fixed and only needed to remove the bottom metal plate and remove a green plug and rebooting it and downloading the firmware again.
When finished i simply turned it off and plugged it back in then reinstalled bottoms plate.

Xhorse Dolphin II and CGDI Godzilla Comparison
Choosing the right key cutting machine is crucial for locksmiths, whether you’re a mobile professional or shop-based. Two top-tier options are the Xhorse Dolphin XP005L (Dolphin II) and the CGDI Godzilla. Here’s a detailed comparison to help you decide which one suits your needs.
.jpg)
Dolphin II vs. CGDI Godzilla Comparison
- Unbeatable Portability
The Dolphin II is designed for locksmiths on the move. Its compact, lightweight build and built-in rechargeable battery allow you to take it anywhere – whether you’re servicing cars, homes, or businesses on-site. No need for a constant power source like the Godzilla, which ties you to a shop.
- Advanced Touchscreen & Wireless Connectivity
- 5-inch adjustable touchscreen for effortless operation.
- Bluetooth & Wi-Fi support for seamless software updates via the Xhorse app.
- Over-the-air updates ensure your machine always has the latest features and key compatibility.
The Godzilla lacks wireless capabilities, meaning manual updates and fewer tech-forward advantages.
- Superior Clamp System & Key Compatibility
The M5 Clamp on the Dolphin II handles a wider variety of keys with precision, including high-security and automotive keys. While the Godzilla can cut standard keys well, it doesn’t match the Dolphin’s adaptability for modern locksmithing needs.
- Future-Proof Investment
With regular software upgrades, the Dolphin II evolves with industry trends, ensuring long-term usability. The Godzilla, while cheaper upfront, may require costly replacements or upgrades sooner.
Godzilla: A Good Machine, But Not the Best
The CGDI Godzilla is a budget-friendly, durable option for shop-based locksmiths, but it lacks:
– Portability (no battery, requires constant power)
– Wireless features (no Bluetooth or Wi-Fi)
– Latest tech advancements (manual updates, no touchscreen.
.jpg)
.jpg)
Conclusion: The Dolphin II Wins
CGDI Godzilla is ideal forLocksmiths who prioritize durability and affordability for a fixed workstation.
If you want a high-performance, portable, and future-proof key cutting machine, the Xhorse Dolphin XP005L is the clear winner. It’s the best choice for locksmiths who value mobility, efficiency, and staying ahead of the competition.
How to Cut Aluminium key by Xhorse Dolphin II M5 Clamp
Question:
Where is the option for aluminium key in Xhorse dolphin xp005l I can’t find it having to use old dolphin XP005.

Answer:
You have to use the M2 clamp.
There is no such an option for the M5 clamp. The Plastic key/aluminium key function was removed.

Xhorse engineer solution:
For keys made of normal conductive materials, place them directly for cutting. For keys made of non-conductive materials, place the keys normally at the beginning of cutting. When the milling cutter starts to rotate, click Pause. After changing the key, click Continue Cutting.
1. Mount blank metal and machine to do a detection test.
2. After detection finishes, simple click PAUSE, swap blade.
3. Click RESUME, this is just 1 step before the spindle start, so no more blank key detection.
Customer simple solution.
Take a metal version key blank and I use the should stopper against the back edge of the clamp, so when u put the key blank in the clamp the tip of the key hits the shoulder stopper ur holding fast up against the clamp.
Then let the machine “located” the key. then as soon as it turns the motor on hit pause.
Then take the metal blank out and swap it with the aluminum blank. again using the shoulder stop to stop the tip of the key.
Then hit continue.
Some people do this for JLR hu101 keys
It works fork plastic keys (HU66) too.
How to Cut Mini Cooper HU92R Key with Xhorse Dolphin XP005L?
Today I’m gonna cut a 2004 Mini Cooper HU92R mechanical key with Xhorse Dolphin II by bitting. Before that, you should get the bitting codes. Since I’ve used LISHI HU92 to decode the lock, let’s go straightly to cut the key.
Cut by bitting >> HU92R >> 820*4100 8 bitting, cut depth 1.25mm >> OK
Follow the prompt to install key blank.
Tip align 2nd position on M5 clamp side B.
.jpg)
.jpg)
.jpg)
.jpg)
Input bitting codes on screen: 3122 3443
Cut key >> Cut
The Dolphin 2 machine will start to cut automatically…
Just wait until it finished.
Then flip over to cut the other side.
Take out the key when key cutting was completed.
It can work perfectly.
Real quick and easy job.
.jpg)
.jpg)
.jpg)
How to Fix Xhorse Dolphin XP005 Error Code 87
Problem:
When turning on the Xhorse Dolphin XP005L key cutting machine it asks for an update. updated to 99% it says network error. the network is fine.It cannot charge battery only via power supply and also displays error code 87. Any solution?

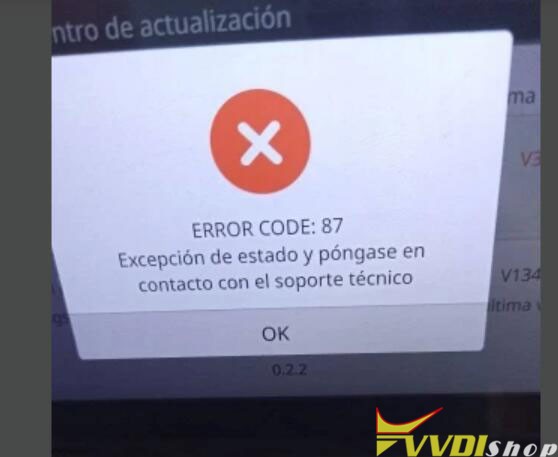

Solution:
Unplug this green cable on the battery, then run an update. Plug the green cable after the upgrade is finished.
