ابزار Xhorse VVDI
Xhose VVDI نرم افزار برنامه نویس اصلی و سخت افزارابزار Xhorse VVDI
Xhose VVDI نرم افزار برنامه نویس اصلی و سخت افزارHow to Add KeylessGo to Mazda3 with Xhorse Smart Key Box?
Xhorse Smart Key Box can be used to add keyless entry/ keyless go functions on 2018 Mazda 3 successfully. Before that, I’ll use Xhorse VVDI Key Tool Max + MINI OBD Tool to add a remote and demonstrate how it works.
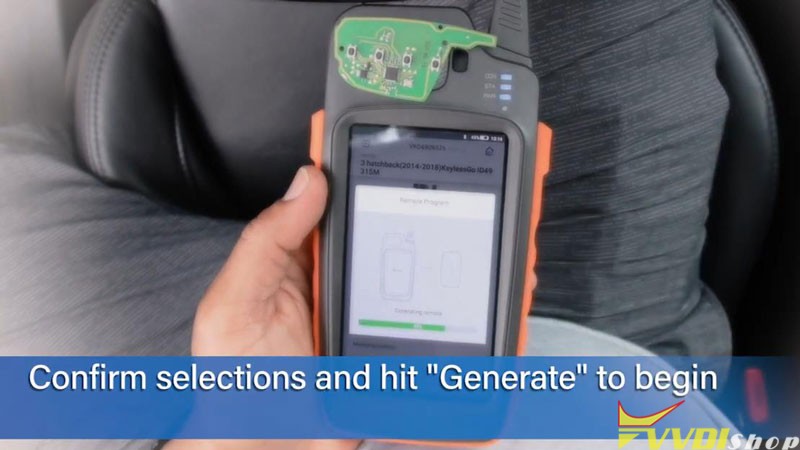
- Generate Smart Remote
Remove PCB board from key shell to be programmed, place it on the VVDI Key Tool Max coil.
Vehicle remote >> Mazda >> 3 hatchback(2014-208) KeylessGo ID49 315M >> Generate
Burn success.
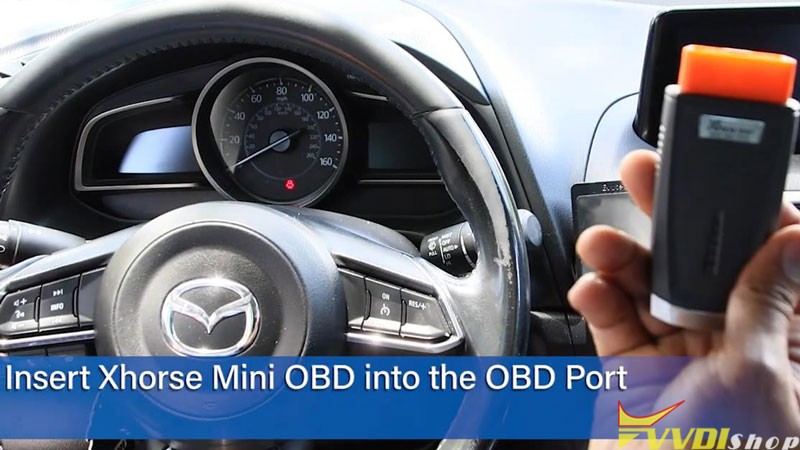
- Program Smart Remote
Insert MINI OBD Tool into the vehicle OBD port,
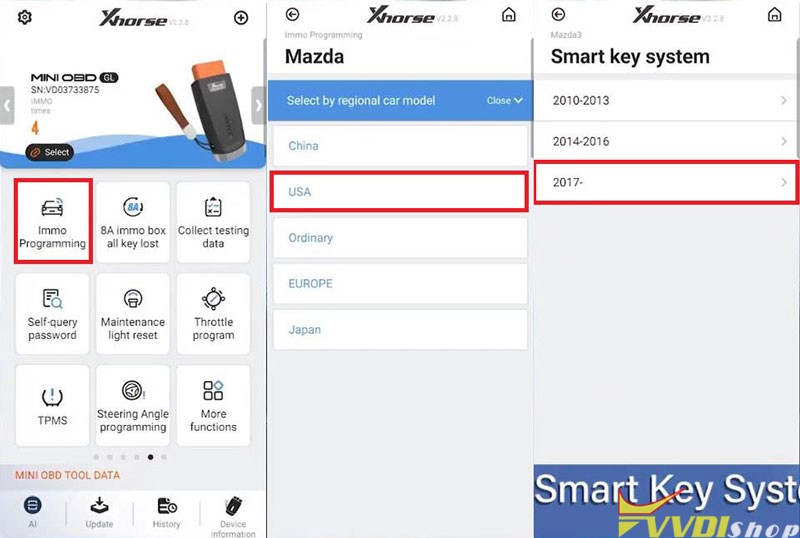
Immo programming >> Mazda >> Select by regional car model >> USA >> Mazda3 >> Smart key system >> 2017- >> Start execution
Follow the prompts to operate:
Take all smart keys out of car.
Press start button of vehicle for 10s, then press start button again when the indicator light of start button changes to yellow.
Operation completed!
Add a key >> OK >> Yes
Please switch ignition on.
Current number of smart key: 3
Read the password…
Completed to read password, press “OK” to match.
It’ll take about 7 minutes to configuring the system, please wait…
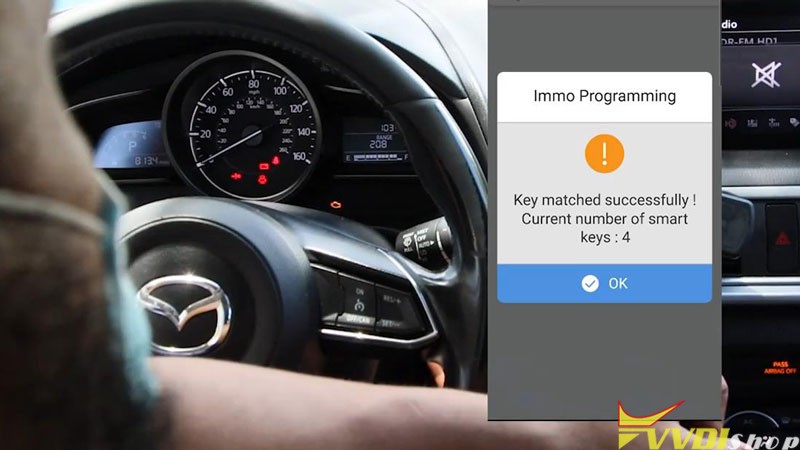
Step on brakes when automatic-shift, step on the clutch when manual-shift and keep the mark end of the smart key to be programmed close to the start button, take other keys out of the car.
Key matched successfully!
Current number of smart keys: 4
After testing the remote successfully, move to next step.
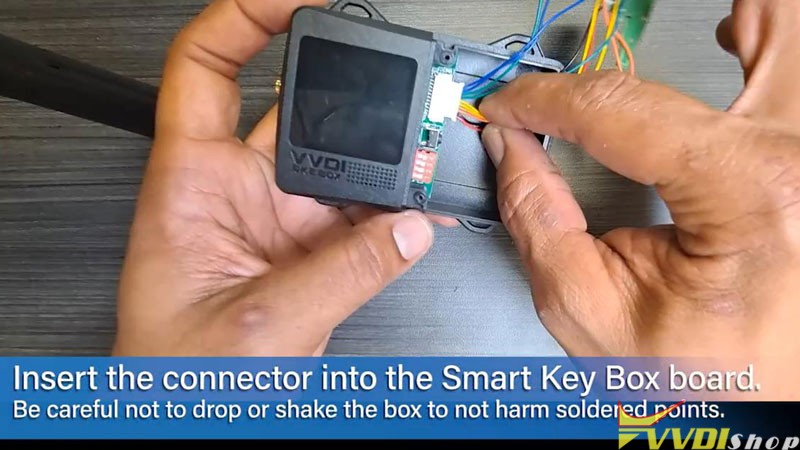
- Install Smart Key Box
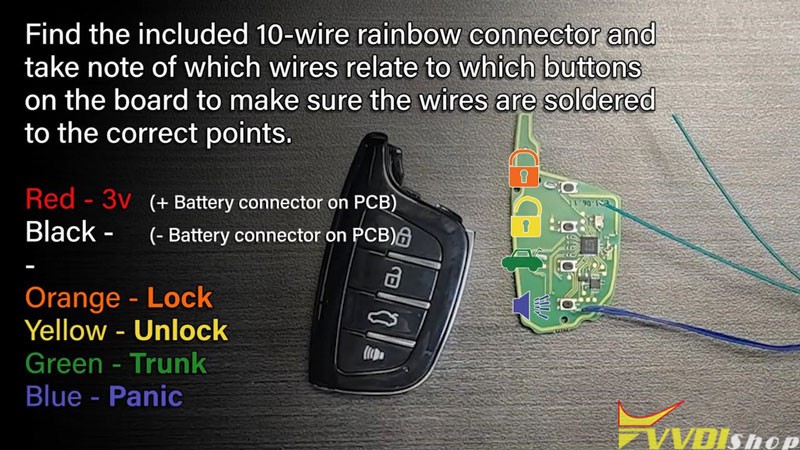
- Solder the connections.
Find the included 10-wire rainbow connector and take note of which wires relate to which buttons on the board to make sure the wires are soldered to the correct points.
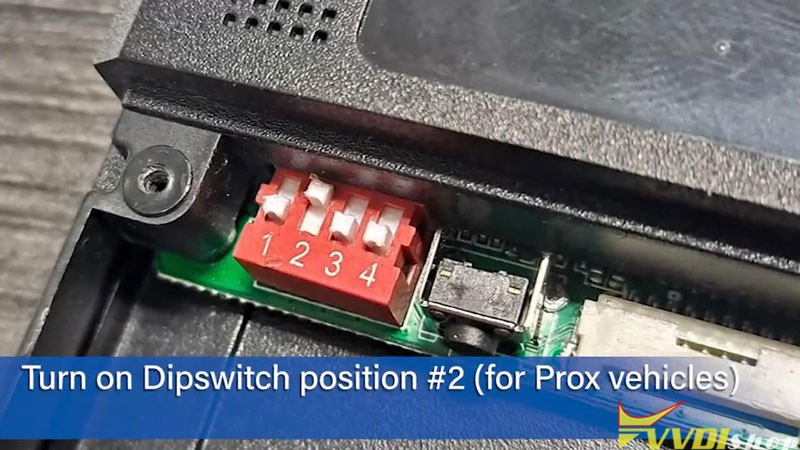
- Insert to Smart Key Box, turn on Dipswitch position #2(for Prox vehicles).
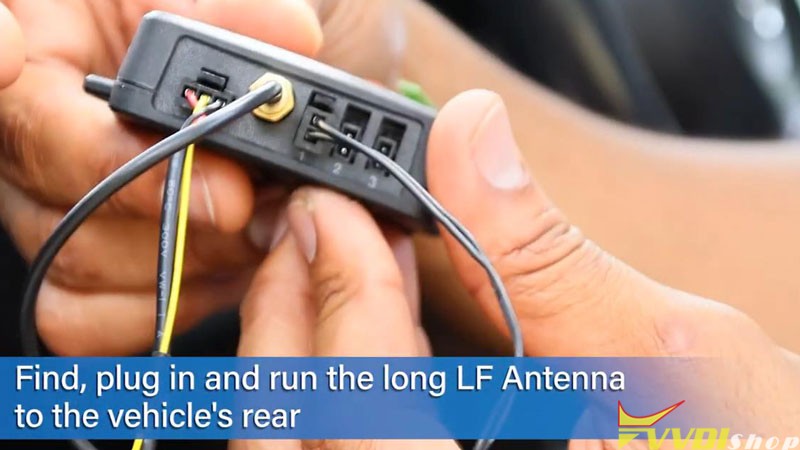
- Connect Smart Key Box with vehicle properly. (power line, HF/LF antenna, OBD cable)

Sync Remote & Smart Key Box
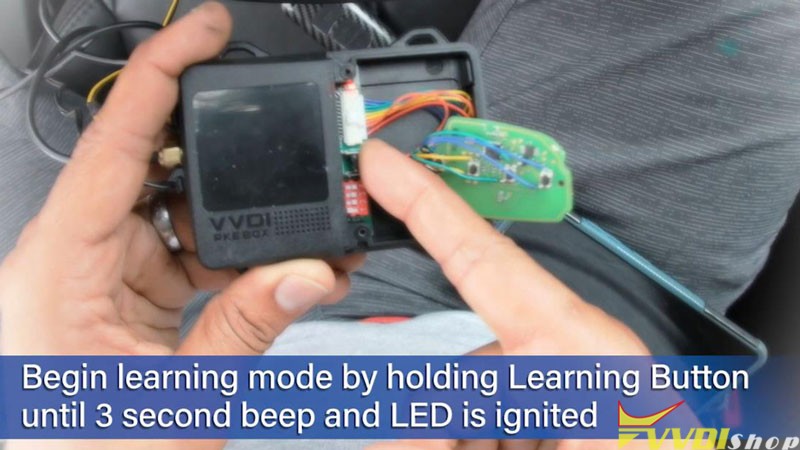
- Holding the learning button until hearing a beep and LED is ignited.
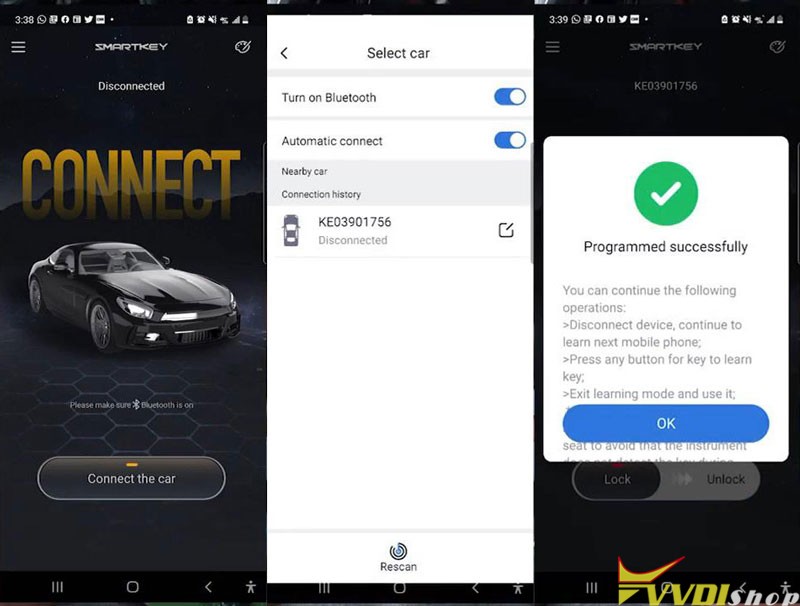
- Open Smart Key Box app, press “connect the car”.
- Press any Onscreen button to bind phone to the app.
(The Smart Key Box can save and connect 6 remotes or phones at a time in addition to car remote count)
- Once all were done, holding the learning button again to exit learning mode.
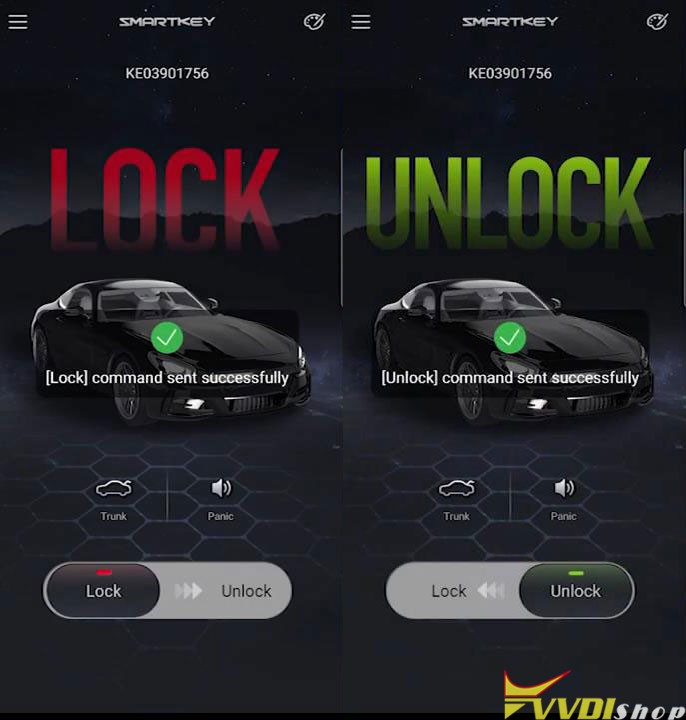
- Test The Remote
Place the Smart Key Box safely under seat/dash cavity. Let’s go out to have a test.
Keep the phone screen to test by leaving vehicle and approaching to check all settings are working.
– Go away, it locks.
– As soon as I get to the car, it unlocks.
Perfect done!
This is how to use Xhorse Smart Key Box to work on a 2018 Mazda 3 successfully.
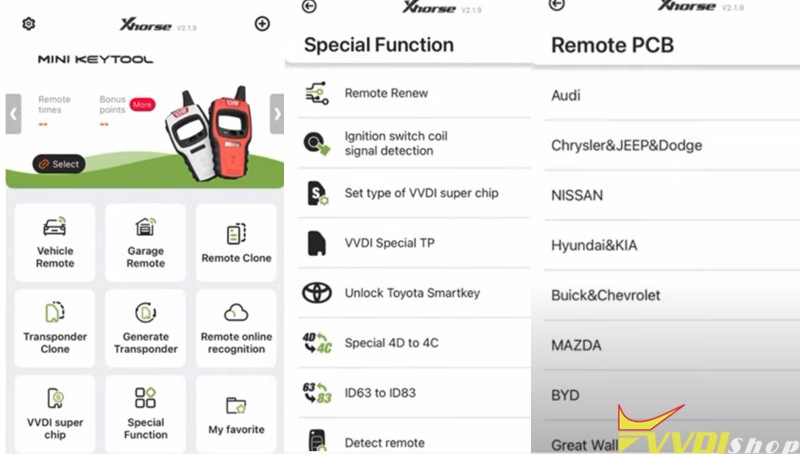
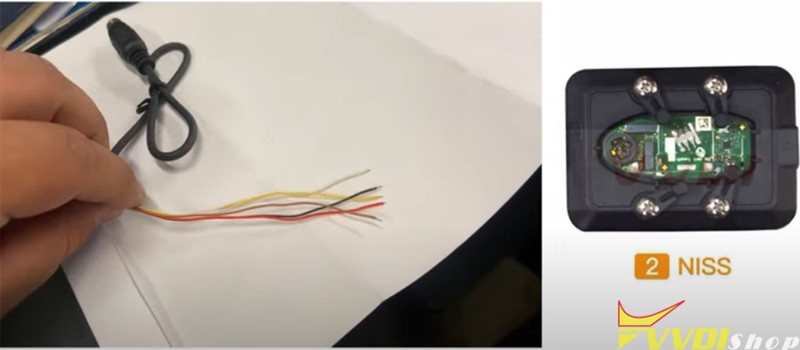
VVDI Mini Key Tool Renew Nissan Smart Key via Renew Adapter
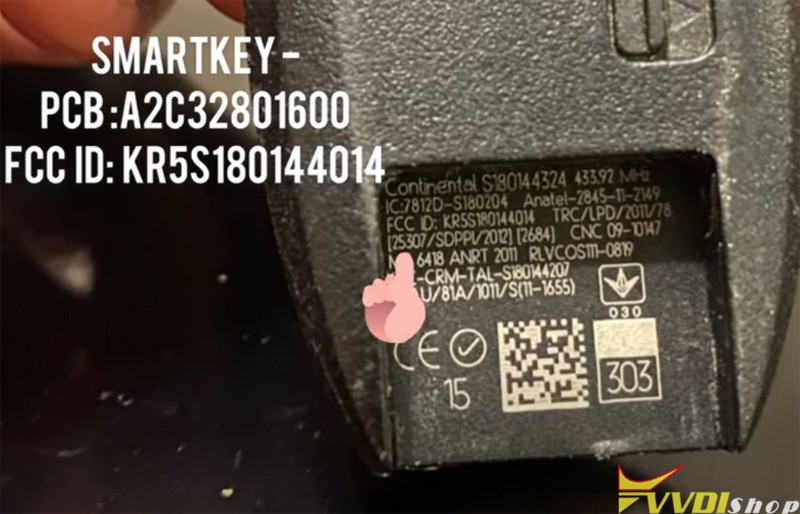
This is a Nisan smart key FCC ID
PCB A2C32801600
FCC ID KR5S180144014
Is it already locked once you program it to a vehicle the chip locks it into that vehicle
In xhorse vvdi mini key tool app, go to Special function- Remote Renew – Nissan – 315mhz hitag2 smart key A2C53297341
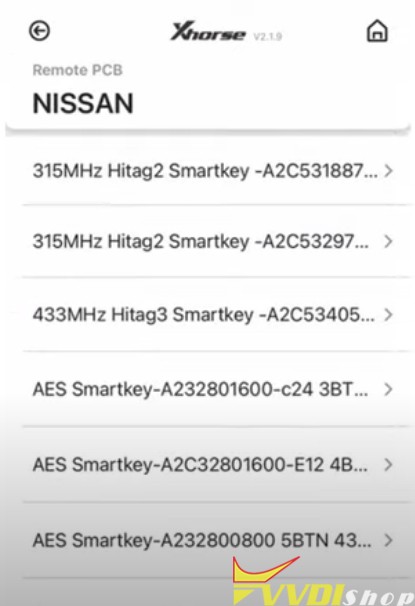
FCC is the same, 4 buttons
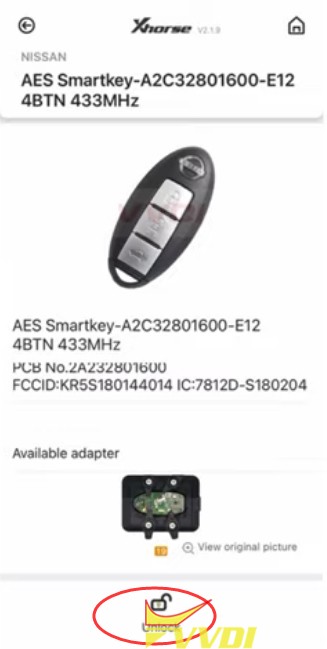
It shows you if there is an available xhorse renew adapter for it
We have two options to renew this key, we choose the adapter because we have the renew adapter. Don’t need to use the wire.
Place the Nissan key circuit board on the adapter, Secure it
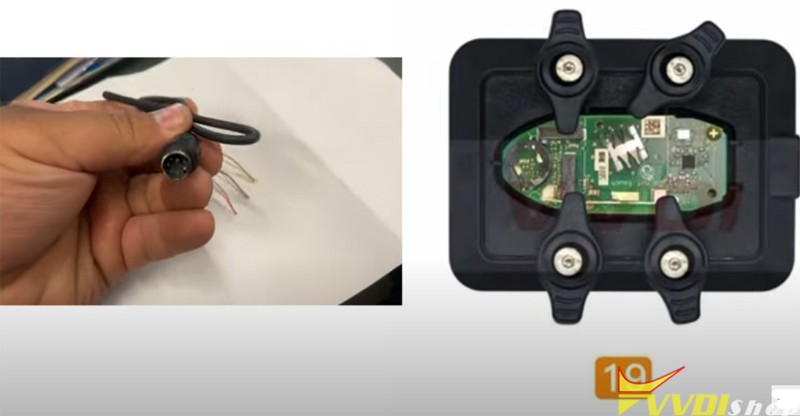
Go ahead and press Unlock
We successfully unlocked the chip the remote has been renewed
We read Nissan smart key to make sure we successfully unlocked it.
It said unlocked.
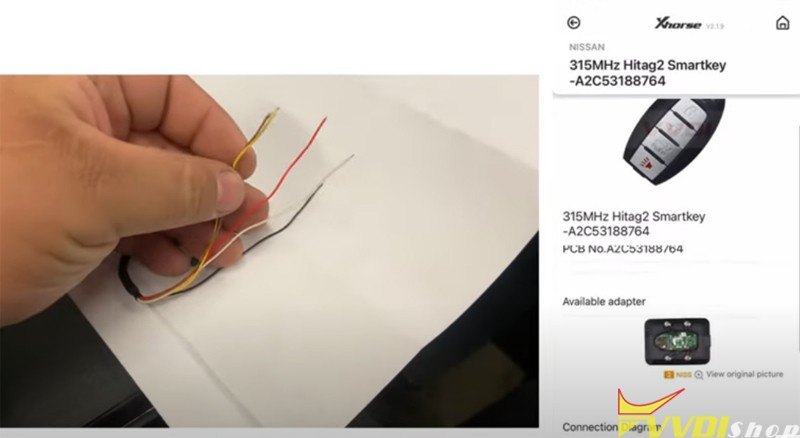
For those who don’t have the renew adapter, you can renew key by soldering there is a connection diagram.
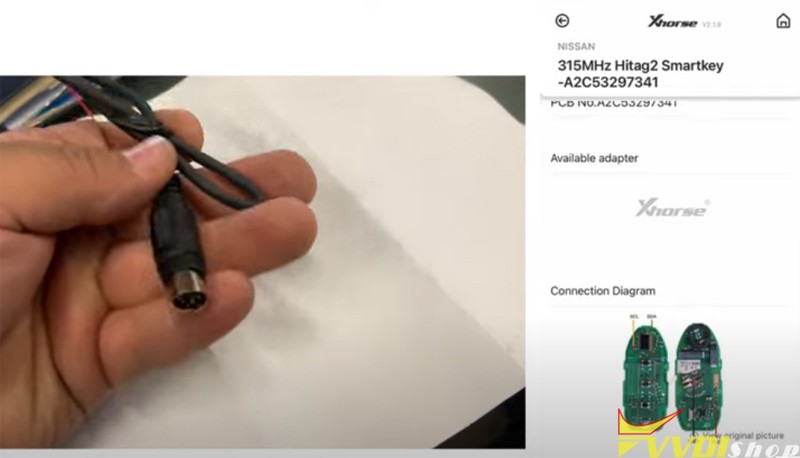
www.vvdishop.com has the wiring diagram of remotes, check remote unlock wiring diagram.
How to Renew Benz ECU ME9.7 with Xhorse VVDI MB?
Here’s a quick easy guide on renewing Mercedes Benz ECU ME9.7 with xhorse vvdi mb tool through OBD
For connection, check the previous post: connect VVDI MB Tool to ME 9.7 ECU
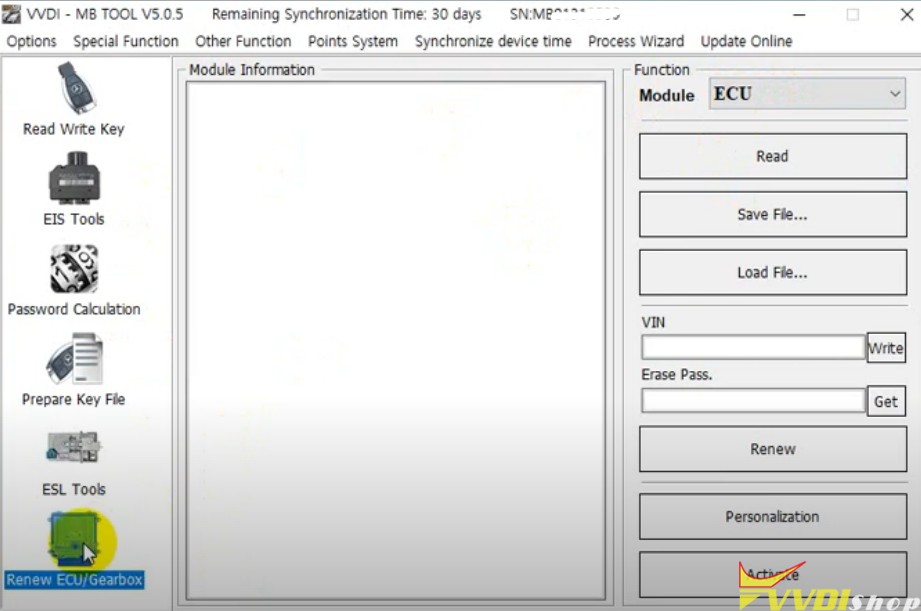
Select Renew ECU/Gearbox Function
Select ECU
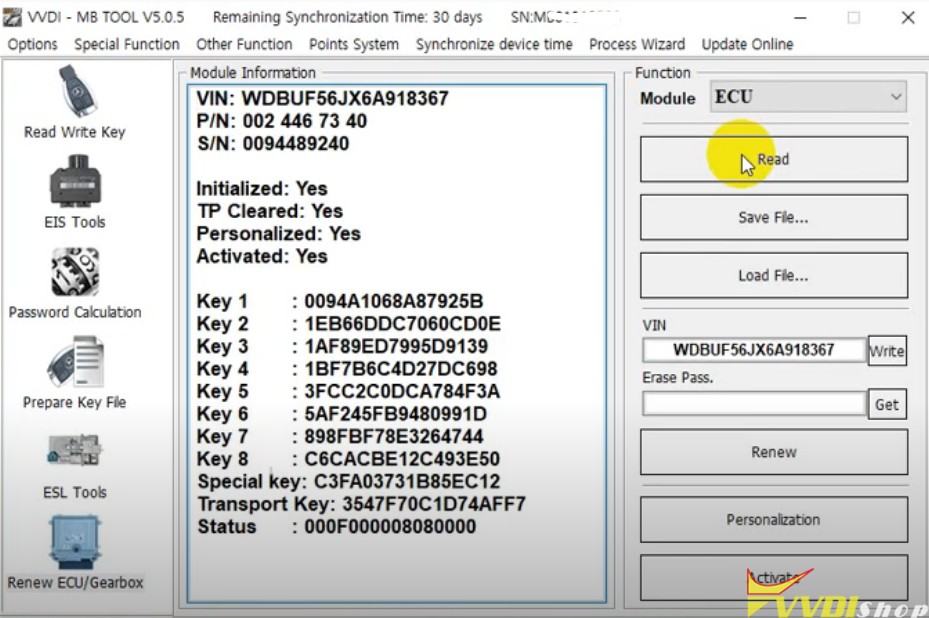
Read ECU information
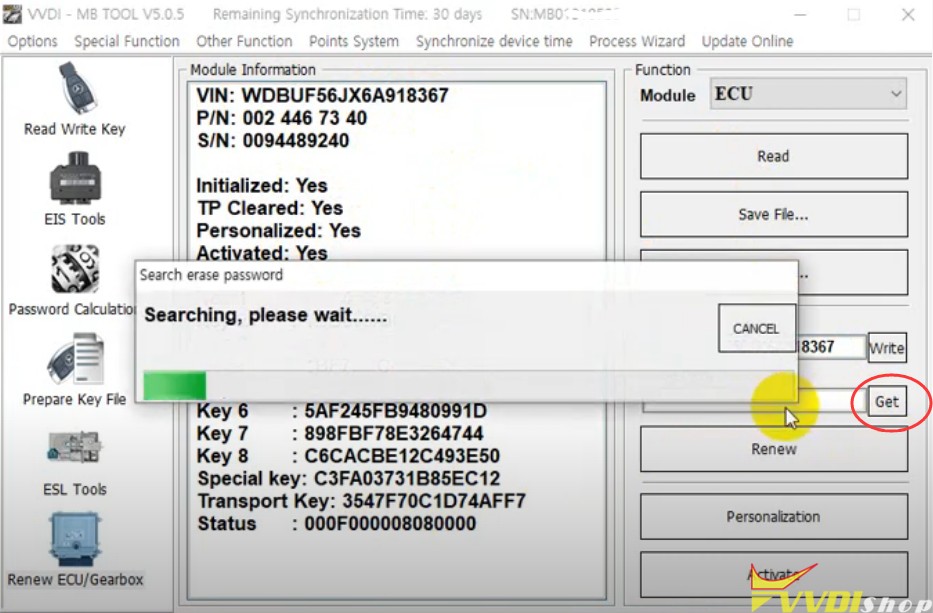
Get Erase password

Press Renew
If failed to erase target unit, renew again
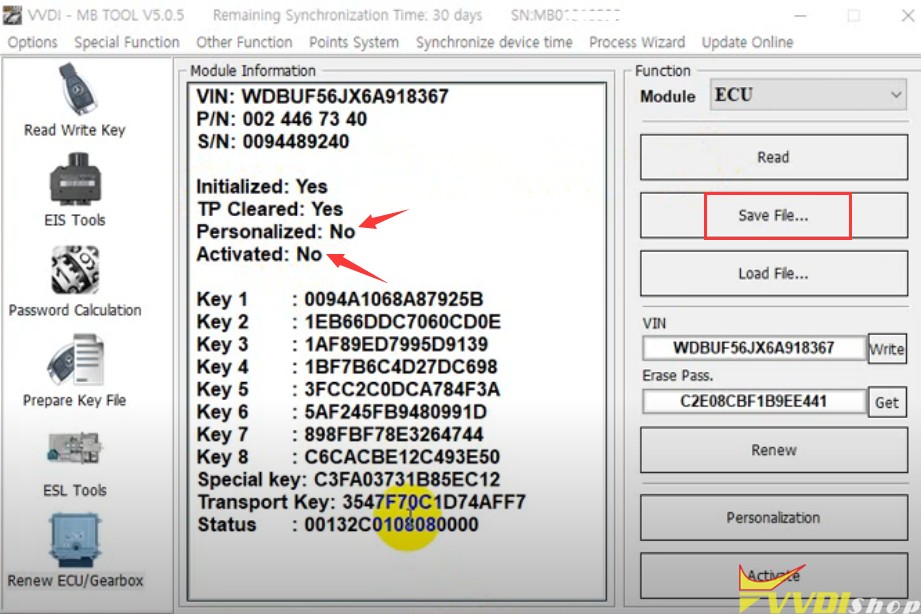
Renew ECU success
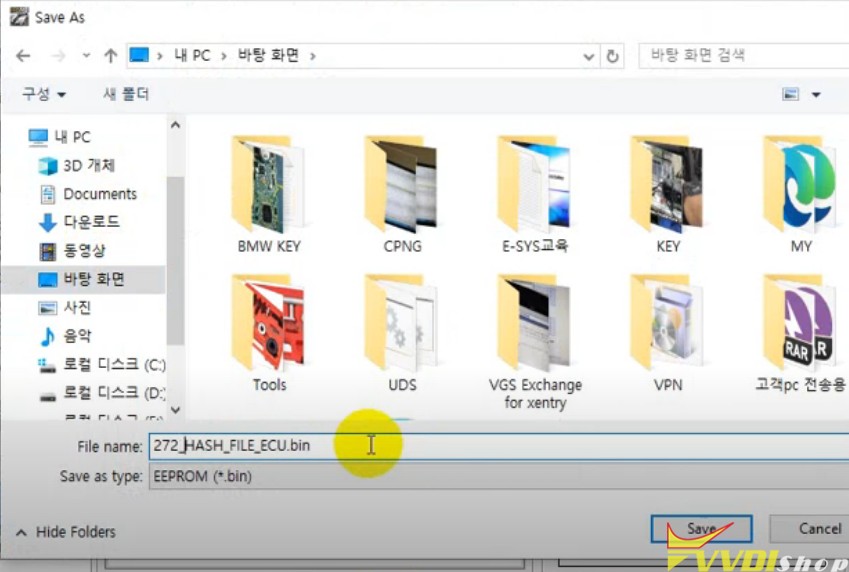
Save data
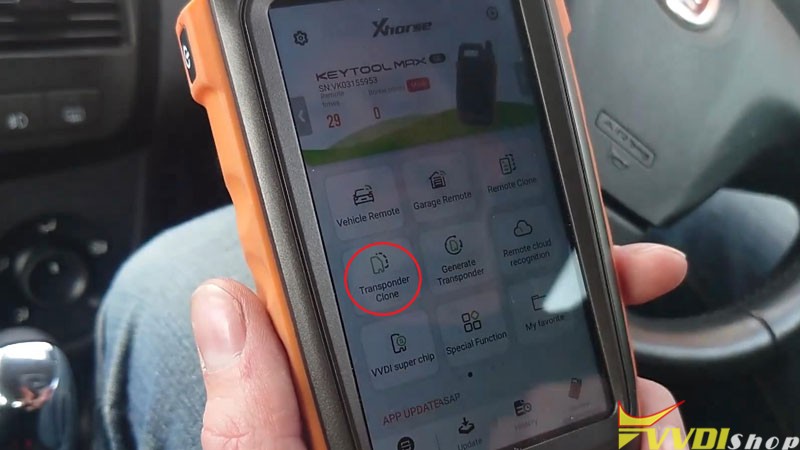
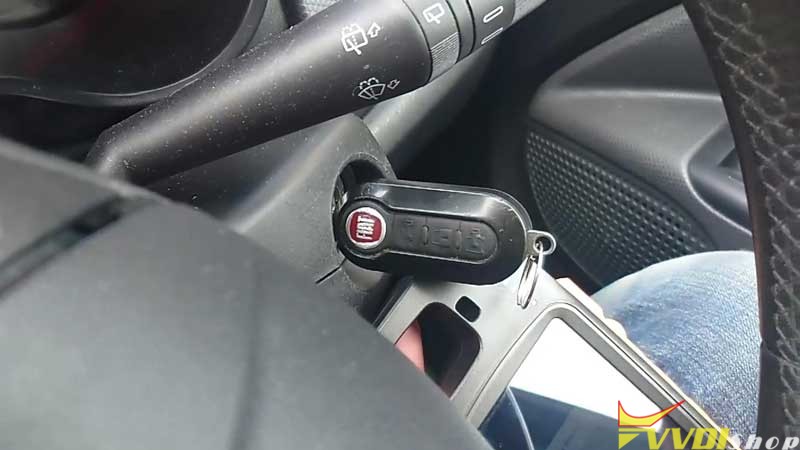
How to Clone 2014 Fiat Doblo key with Xhorse Key Tool Max
How to use Xhorse VVDI Key Tool Max to clone a spare key for 2014 Fiat Doblo? It’s very fast and easy, following I’ll show the procedure.
An original working key, a blank new key and a VVDI Super Chip are required.
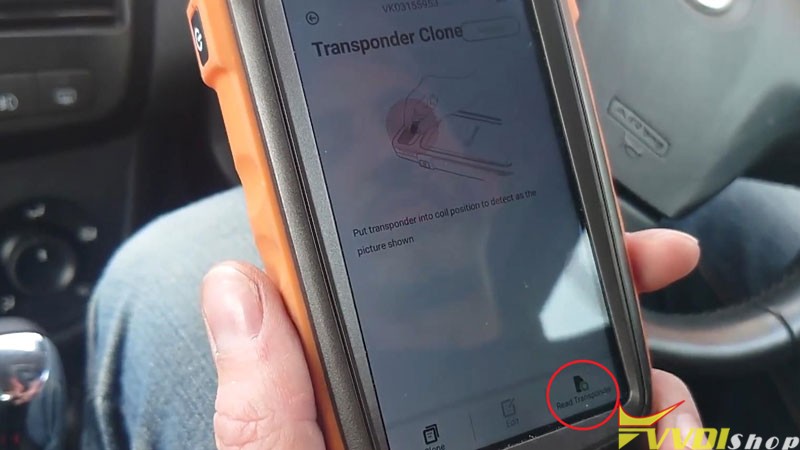
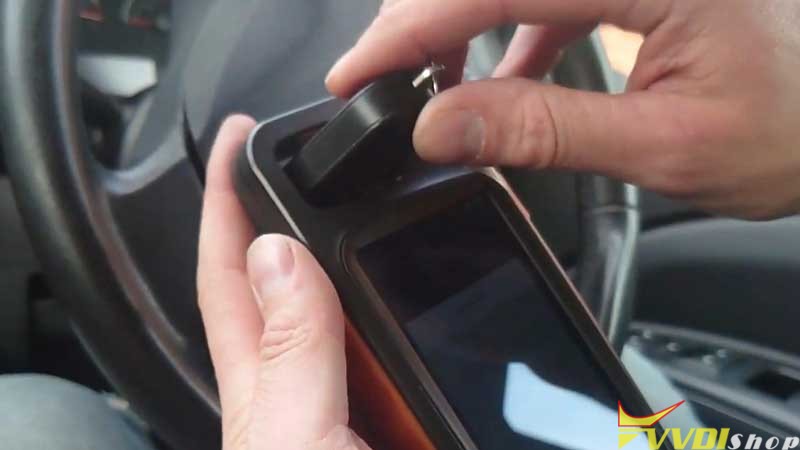
Put the original key into Key Tool Max coil, press
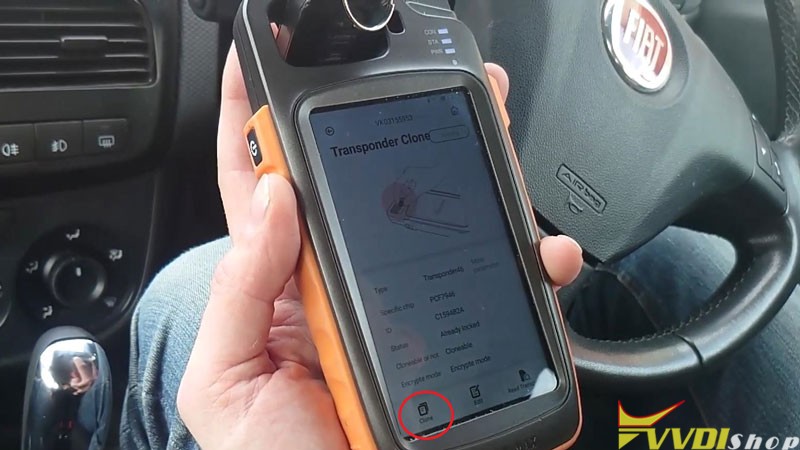
Transponder clone >> Read transponder
Information has read out, it’s cloneable.
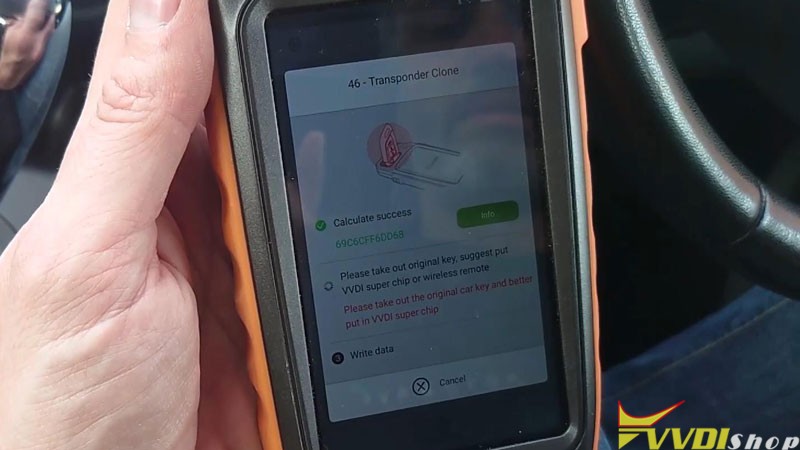
Just follow the instructions to clone, continue to press
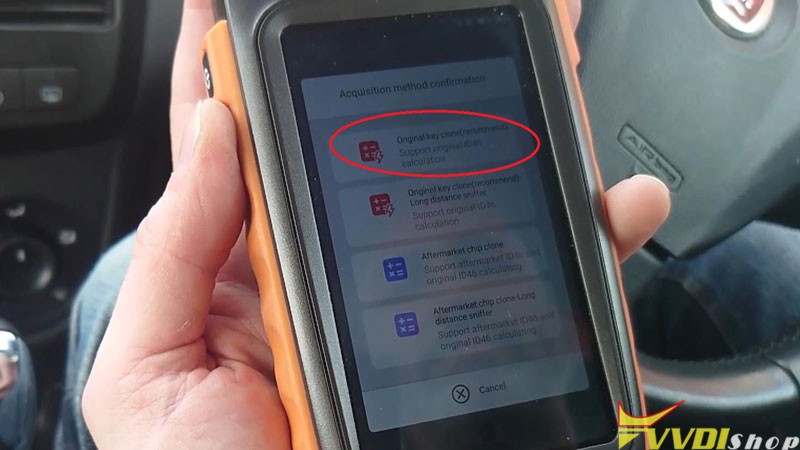
Clone >> Start clone >> 46 transponder clone >> Original key clone(recommended)
Note: don’t remove the original key
It’s asking to sniff at the data, so what I have to do is to put the antenna near the ignition and turn it on.
Put the original key into Key Tool Max coil again as required.
Wait collecting data…
Calculate success.
Take out the original key, then put a Super Chip into coil.
Write data success.
Let’s put the Super Chip inside a new key shell to have a test.
As you can see, it starts the vehicle.
Let me try the original one, both can start the car.
It is a very simple process with VVDI Key Tool Max to clone a key for 2014 Fiat Doblo. It only takes me 4 minutes to finish.
Test Xhorse Dolphin XP005 Probe and Cutter Conductivity
Here is the tip on detecting abnormal conductivity of xhorse dolphin xp005 key cutting machine probe and milling cutter.
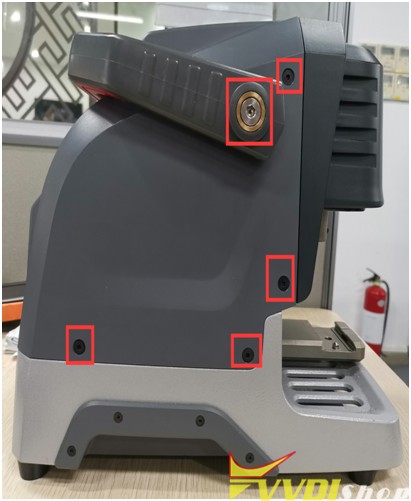
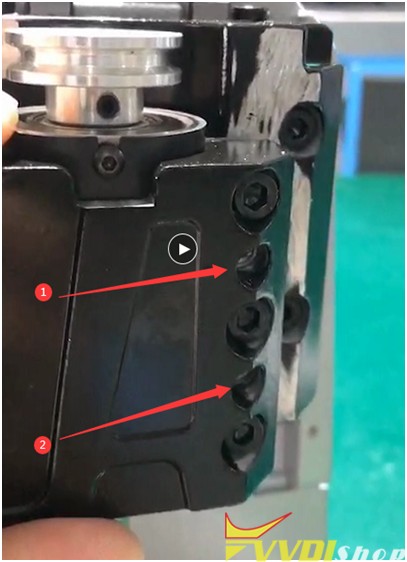
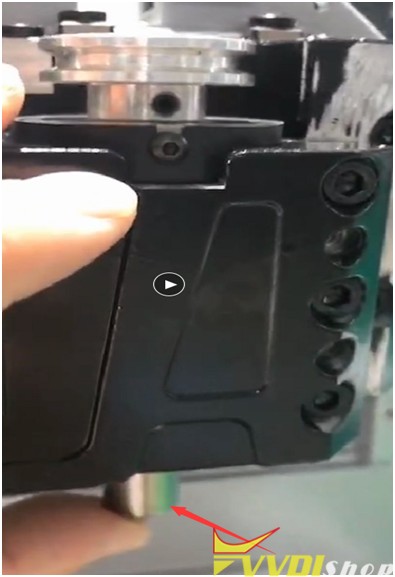
Step 1: Disassemble the back cover, and be careful of the wiring harness of the cover when disassembling
Step 2:
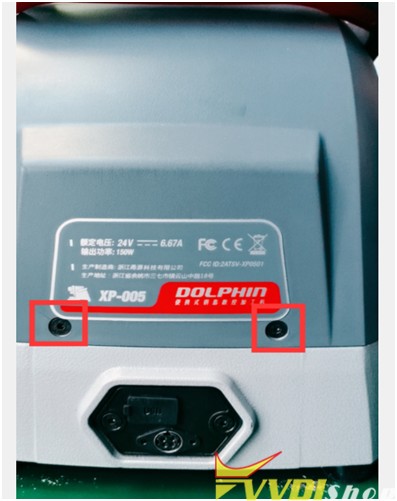
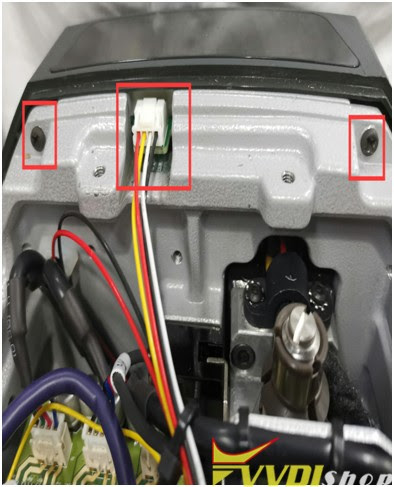
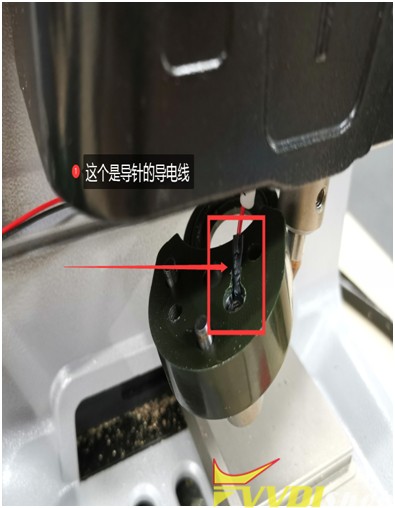
Remove the back cover, you can see these things, take off the wire harness, and remove the Phillips screws (see Figure 1). Take out the rubber pellets from the front of the device. There are screws inside. This strip needs to be removed (Figure 2)
(Figure1)
(Figure2)
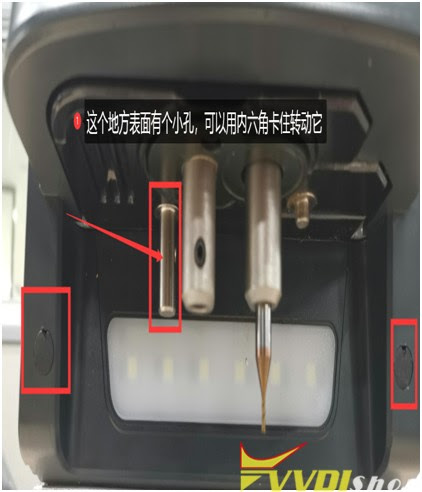
Step 3:
Use a flat-blade screwdriver to turn the lead screw, align the Z-axis and the outer cover on a horizontal surface (as shown in Figure 3 and Figure 4), remove the Z-axis housing after alignment (as shown in Figure 5), and place the probe next to it. Remove the screws (as shown in Figure 6). Remember to be careful when removing it. There is a conductive wire inside (as shown in Figure 7).
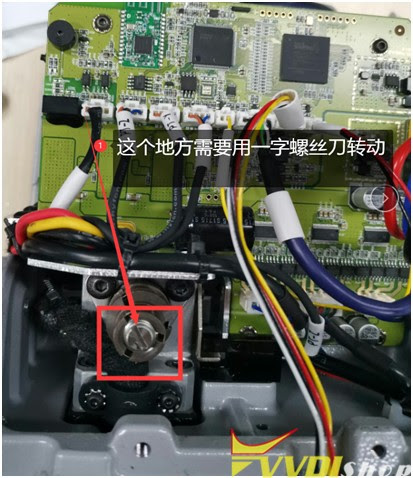
(Figure3)
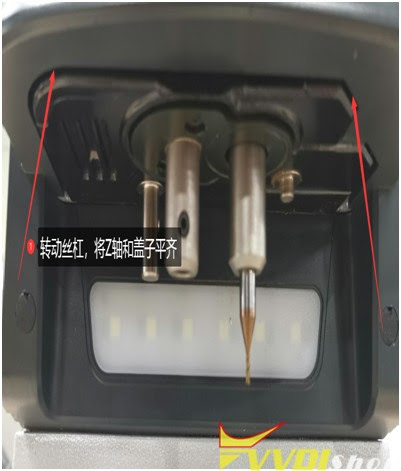
(Figure4)
(Figure5)
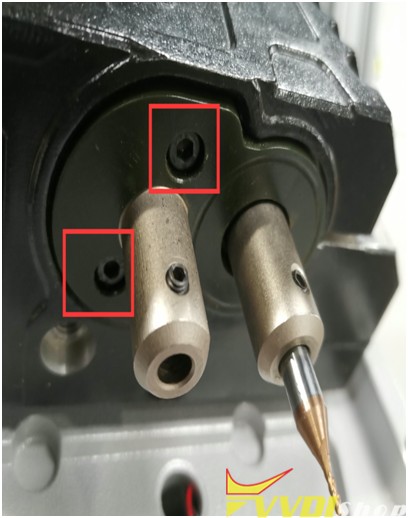
(Figure6)
(Figure7)
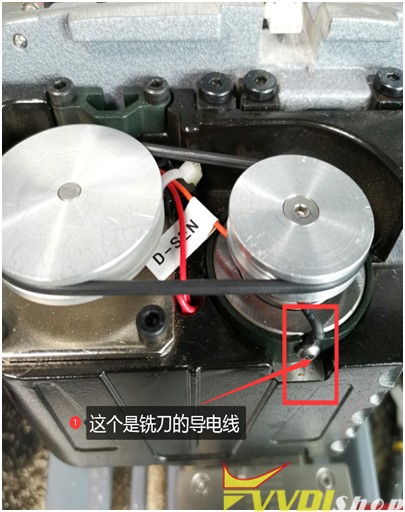
Step 4:
If the above steps are all done, the next step is to check whether the conductive wires of the milling cutter and the probe are conductive or short (as shown in Figure 5 and Figure 7), which needs to be combined with the main board to detect. (Figure 8) (or plug in the cable on the main board, and then check whether the conductivity is normal)
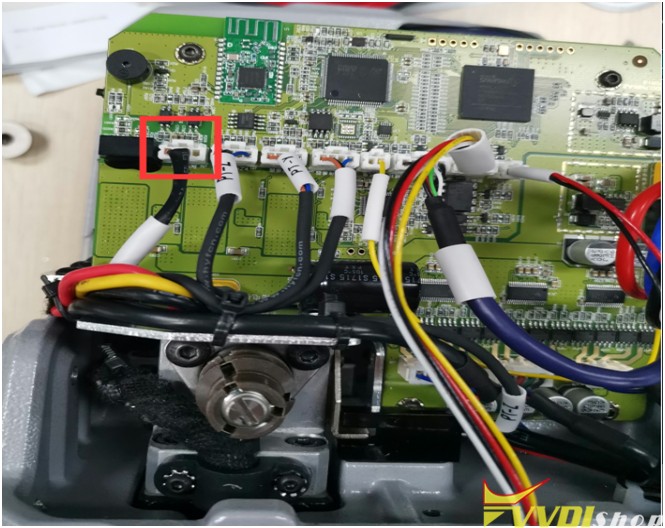
(Figure8)
Step 5: (conductivity of cutter): Loosen the 3 screws of the Z axis (as shown in Figure 9), and then tighten the two screws (as shown in Figure 10). Push these two screws to the inside until there is a gap. This is to take out the shaft (as shown in Figure 11), press your finger on the position of the milling cutter hole, and push it up with a little force. Come up, and then observe whether the white paper inside is broken (as shown in Figure 12), if it is broken, it needs to be replaced. If it is not broken, observe whether there is iron filings in the bearing hole
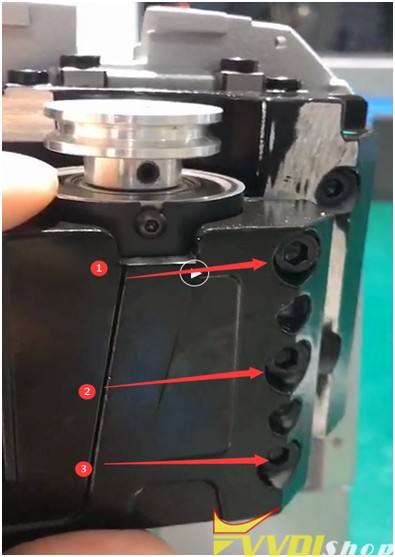
(Figure 9)
(Figure10)
(Figure11)

(Figure12)
Any questions feel free to contact us.
https://www.vvdishop.com/service/test-xhorse-dolphin-xp005-probe-cutter-conductivity.html